What is an Atomic Function for OTN?

This post briefly introduces the concept of the Atomic Functions that ITU-T G.798 uses to specify the Performance Requirements of OTN systems.


What is an Atomic Function for OTN Applications?

If you have read through many of the ITU standards, particularly those documents that discuss the declaration and clearance of defect conditions, you have come across Atomic Functions.

For OTN applications, ITU-T G.798 is the primary standard that defines and describes defect conditions.

If you want to be able to read through ITU-T G.798 and have any chance of understanding that standard, then you will need to understand what these atomic functions are.

I will tell you that you will have a tough time understanding ITU-T G.798 without understanding these atomic functions.

Therefore, to assist you with this, I will dedicate numerous blog postings to explain and define many of these atomic functions for you.

NOTE:  I also cover these Atomic Functions extensively in Lesson 8 within THE BEST DARN OTN TRAINING PRESENTATION…PERIOD!!!

OK, So What are these Atomic Functions?

You can think of these atomic functions as blocks of circuitry that do certain things, like pass traffic, compute and insert overhead fields, check for, and declare or clear defects, etc.

These atomic functions are theoretical electrical or optical circuits.  They have their own I/O, and ITU specifies each function’s functional architecture and behavior.

It is indeed possible that a Semiconductor Chip Vendor or System Manufacturer could make products that exactly match ITU’s descriptions for these atomic functions.  However, no Semiconductor Chip Vendor nor System Manufacturer does this.  Nor does ITU require this.

ITU has defined these Atomic Functions such that anyone can judiciously connect a number of them to create an Optical Network Product, such as an OTN Framer or Transceiver.

However, if you were to go onto Google and search for any (for example) OTUk_TT_Sk chips or systems on the marketplace, you will not find any.  But that’s fine.  ITU does not require that people designing and manufacturing OTN Equipment make chips with these same names nor have the same I/O as these Atomic Functions.

OK, So Why bother with these Atomic Functions?

The System Designer is not required to design a (for example) OTUk_TT_Sk function chip.  They are NOT required to develop chips with the same I/O (for Traffic Data, System Management, etc.).

However, if you were to design and build networking equipment that handles OTN traffic, you are required to perform the functions that ITU specified for these atomic functions.

For example, if you design a line card that receives an OTUk signal and performs the following functions on this signal.

  • Checks for defects and declare and clear them as appropriate, and
  • Monitors the OTUk signal for bit errors and
  • Converts this OTUk signal into an ODUk signal for further processing

Although you are NOT required to have OTUk_TT_Sk and OTUk/ODUk_A_Sk atomic function chips sitting on your line card, you are required to support all of the ITU functionality defined for those functional blocks.

Therefore, you must understand the following:

  1. Which atomic functions apply to your system (or chip) design, and
  2. What are the requirements associated with each of these applicable atomic functions?

If you understand both of these items, you fully understand the Performance Monitoring requirements for your OTN system or chip.

What type of Atomic Functions does ITU-T G.798 define?

ITU-T G.798 defines two basic types of Atomic Functions:

  • Adaptation Functions and
  • Trail Termination Functions

I will briefly describe each of these types of Atomic Functions below.

Adaptation Functions

Adaptation Functions are responsible for terminating a signal at a particular OTN or network layer and then converting that signal into another OTN or network layer.

For example, an Adaptation function that we discuss in another post is a function that converts an ODUk signal into an OTUk signal (e.g., the OTUk/ODUk_A_So function).

Whenever you read about atomic functions (in ITU-T G.798), you can also tell that you are dealing with an Adaptation atomic function if you see the upper-case letter A within its name.

For example, I have listed some Adaptation functions that we will discuss within this blog below.

  • OTSi/OTUk-a_A_So – The OTSi to OTUk Adaptation Source Function with FEC (for OTU1 and OTU2 Applications)
  • OTSi/OTUk-a_A_Sk – The OTSi to OTUk Adaptation Sink Function with FEC (for OTU1 and OTU2 Applications)
  • OTSiG/OTUk-a_A_So – The OTSiG to OTUk Adaptation Source Function with FEC (for OTU3 and OTU4 Applications)
  • OTSiG/OTUk-a_A_Sk – The OTSiG to OTUk Adaptation Source Function with FEC (for OTU3 and OTU4 Applications)
  • OTUk/ODUk_A_So – The OTUk to ODUk Adaptation Source Function
  • OTUk/ODUk_A_Sk – The OTUk to ODUk Adaptation Sink Function
  • ODUkP/ODUj-21_A_So – The ODUkP to ODUj Multiplexer Source Atomic Function
  • ODUkP/ODUj-21_A_Sk – The ODUkP to ODUj Multiplexer Sink Atomic Function

Another Way to Identify an Adaptation Function?

ITU in general (and indeed in ITU-T G.798) will identify the Adaptation Function with trapezoidal-shaped blocks, as shown below in Figure 1.

OTUk/ODUk_A_Sk Function - Adaptation Atomic Function

Figure 1, A Simple Illustration of an Adaptation Function (per ITU-T G.798)

Now that we’ve briefly introduced you to Adaptation Functions let’s move on to Trail Termination Functions.

Clueless about OTN? We Can Help!!! Click on the Banner Below to Learn More!!!

Corporate Discounts Available!!!

Trail-Termination Functions

Trail Termination functions are typically responsible for monitoring the quality of a signal as it travels from one reference point (where something called the Trail Termination Source function resides) to another reference point (where another thing is called the Trail Termination Sink function lies).

When you read about atomic functions (in ITU-T G.798), you can also tell that you are dealing with a Trail Termination atomic function if you see the upper-case letters TT within its name.

The Trail Termination functions allow us to declare/clear defects and flag/count bit errors.

I’ve listed some of the Atomic Trail-Termination Functions we will discuss in this blog below.

  • OTUk_TT_So – The OTUk Trail Termination Source Function
  • OTUk_TT_Sk – The OTUk Trail Termination Sink Function
  • ODUP_TT_So – The ODUk Trail Termination Source Function (Path)
  • ODUP_TT_Sk – The ODUk Trail Termination Sink Function (Path)
  • ODUT_TT_So – The ODUk Trail Termination Source Function (TCM)
  • ODUT_TT_Sk – The ODUk Trail Termination Sink Function (TCM)

Another way to Identify a Trail-Termination Function?

In general (and indeed in ITU-T G.798), ITU will identify Trail Termination Function with triangular-shaped blocks.  I show an example of a drawing with a Trail-Termination below in Figure 2.

OTUk_TT_Sk Function - Trail Trace Atomic Function

Figure 2, A Simple Illustration of a Trail Termination Function (per ITU-T G.798)

We will discuss these atomic functions in greater detail in other posts.


Has Inflation got You Down? Our Price Discounts Can Help You Beat Inflation and Help You to Become an Expert on OTN!!! Click on the Banner Below to Learn More!!

Discounts Available for a Short Time!!

For More Information on OTN Posts in this Blog, click on the Image below.

OTN Related Blog

OTN Related Topics within this Blog

OTN Related Topics within this Blog General Topics Consequent Equations - What are they and How can you use them? ...

What is PT = 0x21 for OTN Applications?

This post discusses and describes the PT = 21 Method for Mapping and Multiplexing Lower-Speed ODUj signals into a Higher-Speed ODUk Signal.


What is PT (Payload Type) = 0x21 for OTN Applications, and what does it Mean?

Whenever we are mapping/multiplexing lower-speed ODUj signals into a higher-speed ODUk signal, for up to the ODU3 rate, we have the following two options:

  • Use the PT = 20 (or 0x20) Method for Mapping/Multiplexing the ODUj tributary signals into the ODUk, or
  • Use the PT = 21 (or 0x21) Method for Mapping/Multiplexing the ODUj tributary signals into the ODUk.

If you wish to map/multiplex some lower-speed ODUj signals into an ODU4 signal, then you MUST use the PT  = 21 (ox21) approach.

NOTE:  We discuss the PT = 21 Approach (for mapping/multiplexing) some lower-speed ODUj tributary signals into an ODU4 in Lesson 5/ODU4 within THE BEST DARN OTN TRAINING PRESENTATION…PERIOD!!!

What is the PT = 21 Method?

Whenever we use the PT = 21 Method, we will set the PT byte (within the PSI Message) to the value 0x21 within this OPUk/ODUk signal.

The PT = 21 Method for Mapping/Multiplexing of ODUj signals into an ODUk signal has the following characteristics.

  • We do Mapping/Multiplexing with 1.25Gbps time-slots (instead of the 2.5Gbps time-slots for PT = 20).
  • In most cases, we use GMP to map the ODUj signal into the ODTUk.ts or ODTUjk structures.
  • However, we do use AMP as the mapping procedure in some cases.

Is the PT = 21 Method better than PT = 20 Method?

The PT = 21 Method is the newer standard and is (therefore) the preferred approach.

For example, for 2-Fibre/2-Lambda Shared-Ring Protection-Switching applications, ITU-T G.873.2 strongly recommends that the System Designer use the PT = 21 methods for combining the Working and Protection time-slots into a single ODUk signal.

Please see the 2-Fibre/2-Lambda Shared-Ring Protection-Switching post for more information on this topic.

What Mapping/Multiplexing Schemes can one use for the PT = 21 Method for Mapping/Multiplexing ODUj Signals into an ODUk Signal?

I summarize the Mapping/Multiplexing scheme information for each of the PT = 21 Cases (for Mapping/Multiplexing Numerous Lower-Speed ODUj signals into a Higher-Speed ODUk signal) in Table 1 below.

Table 1, Summary of Schemes for Mapping/Multiplexing Multiple Lower-Speed ODUj Signals into a Higher-Speed ODUk Signal, PT = 0x21

ODUj SignalMapping StructureMapping MethodNumber of ODUj SignalsIntermediate StructureODUk/OPUk Signal
ODU0ODTU2.1GMP8ODTUG2ODU2/OPU2
ODUflexODTU2.tsGMP1 to 8ODTUG2ODU2/OPU2
ODU1ODTU12AMP4ODTUG2ODU2/OPU2
ODU0ODTU3.1GMP32ODTUG3ODU3/OPU3
ODUflexODTU3.tsGMP1 to 32ODTUG3ODU3/OPU3
ODU1ODTU13AMP16ODTUG3ODU3/OPU3
ODU2ODTU23AMP4ODTUG3ODU3/OPU3
ODU2eODTU3.9GMP3ODTUG3ODU3/OPU3
ODU0ODTU4.1GMP80ODTUG4ODU4/OPU4
ODUflexODTU4.tsGMP1 to 80ODTUG4ODU4/OPU4
ODU1ODTU4.2GMP40ODTUG4ODU4/OPU4
ODU2ODTU4.8GMP10ODTUG4ODU4/OPU4
ODU2eODTU4.8GMP10ODTUG4ODU4/OPU4
ODU3ODTU4.31GMP2ODTUG4ODU4/OPU4

I have also drawn out these cases below as well.

  • ODU0 ⇒ ODTU2.1 ⇒ ×8 ⇒ ODTUG2 ⇒ OPU2 ⇒ ODU2

This scheme will map/multiplex as many as 8 ODU0 signals into an ODU2 signal.

ODU0 to ODU2 - Using PT = 21 Method

Figure 1, Simple Illustration of the ODU0 -> ODU2 Multiplexing/Mapping scheme

Click on the figure above to learn more about this Mapping/Multiplexing scheme.  (COMING SOON).


  • ODU1 ⇒ ODTU12 ⇒ ×4 ⇒ ODTUG2 ⇒ OPU2 ⇒ ODU2

This scheme will allow one to map/multiplex as many as 4 ODU1 signals into an ODU2 signal.

ODUflex to ODU4 - Using PT = 21 Method


Figure 2, Simple Illustration of the ODU1 -> ODU2 Multiplexing/Mapping scheme.

Click on the figure above to learn more about this Mapping/Multiplexing scheme.  (COMING SOON).


  • ODUflex ⇒ ODTU2.ts ⇒ ×8/ts ⇒ ODTU2G ⇒ OPU2 ⇒ ODU2

This scheme will allow one to map/multiplex anywhere from 1 to 8 ODUflex signals into an ODU2 signal.

ODUflex to ODU2 - Using PT = 21 Method

Figure 3, Simple Illustration of the ODUflex ⇒ ODU2 Multiplexing/Mapping scheme.

Click on the figure above to learn more about this Mapping/Multiplexing scheme.  (COMING SOON).

Clueless about OTN? We Can Help!!! Click on the Banner Below to Learn More!!

Corporate Discounts Available!!


  • ODU0 ⇒ ODTU3.1 ⇒ ×32 ⇒ ODTUG3 ⇒ OPU3 ⇒ ODU3

This scheme will allow one to map/multiplex as many as 32 ODU0 signals into an ODU3 signal.

ODU0 to ODU3 - Using PT = 21 Method

Figure 4, Simple Illustration of the ODU0 ⇒ ODU3 Mapping/Multiplexing scheme

Click on the figure above to learn more about this Mapping/Multiplexing scheme.  (COMING SOON).


  • ODU1 ⇒ ODTU13 ⇒ ×16 ⇒ ODTUG3 ⇒ OPU3 ⇒ ODU3

This scheme will allow one to map/multiplex as many as 16 ODU1 signals into an ODU3 signal.

ODU1 to ODU3 - Using PT = 21 Method


Figure 5, Simple Illustration of the ODU1 ⇒ ODU3 Mapping/Multiplexing scheme.

Click on the figure above to learn more about this Mapping/Multiplexing scheme.  (COMING SOON).


  • ODU2 ⇒ ODTU23 ⇒ ×4 ⇒ ODTUG3 ⇒ OPU3 ⇒ ODU3

This scheme will allow one to map/multiplex as many as 4 ODU2 signals into an ODU3 signal.

ODU2 to ODU3 - Using PT = 21 Method

Figure 6, Simple Illustration of the ODU2 ⇒ ODU3 Mapping/Multiplexing scheme.

Click on the figure above to learn more about this Mapping/Multiplexing scheme.  (COMING SOON).


  • ODU2e ⇒ ODTU3.9 ⇒ ×3 ⇒ ODTUG3 ⇒ OPU3 ⇒ ODU3

This scheme will allow one to map/multiplex as many as 3 ODU2e signals into an ODU3 signal.

ODU2e to ODU3 - Using PT = 21 Method

Figure 7, Simple Illustration of the ODU2e ⇒ ODU3 Mapping/Multiplexing scheme. 

Click on the figure above to learn more about this Mapping/Multiplexing scheme.  (COMING SOON).


  • ODUflex ⇒ ODTU3.ts ⇒ ×32/ts ⇒ ODTUG3 ⇒ OPU3 ⇒ ODU3

This scheme will allow one to map/multiplex anywhere from 1 to 32 ODUflex signals into an ODU3 signal.

ODUflex to ODU3 - Using PT = 21 Method

Figure 8, Simple Illustration of the ODUflex ⇒ ODU3 Mapping/Multiplexing scheme.  

Click on the figure above to learn more about this Mapping/Multiplexing scheme.  (COMING SOON).


  • ODU0 ⇒ ODTU4.1 ⇒ ×80 ⇒ ODTUG4 ⇒ OPU4 ⇒ ODU4

This scheme will allow one to map/multiplex as many 80 ODU0 signals into an ODU4 signal.

ODU0 to ODU4 - Using PT = 21 Method

Figure 9, Simple Illustration of the ODU0 ⇒ ODU4 Mapping/Multiplexing scheme.  

Click HERE or click on the figure above to learn more about this Mapping/Multiplexing scheme.


  • ODU1 ⇒ ODTU4.2 ⇒ ×40 ⇒ ODTUG4 ⇒ OPU4 ⇒ ODU4

This scheme will allow one to map/multiplex as many as 40 ODU1 signals into an ODU4 signal.

ODU1 to ODU4 - Using PT = 21 Method

Figure 10, Simple Illustration of the ODU1 ⇒ ODU4 Mapping/Multiplexing scheme.

Click HERE or Click on the figure above to learn more about this Mapping/Multiplexing scheme.  (*).


  • ODU2 ⇒ ODTU4.8 ⇒ ×10 ⇒ ODTUG4 ⇒ OPU4 ⇒ ODU4

This scheme will allow one to map/multiplex as many as 10 ODU2 signals into an ODU4 signal.

ODU2 to ODU4 - Using PT = 21 Method

Figure 11, Simple Illustration of the ODU2 ⇒ ODU4 Mapping/Multiplexing scheme.

Click HERE or Click on the figure above to learn more about this Mapping/Multiplexing scheme.  (*).


  • ODU2e ⇒ ODTU4.8 ⇒ ×10 ⇒ ODTUG4 ⇒ OPU4 ⇒ ODU4

This scheme will allow one to map/multiplex as many as 10 ODU2e signals into an ODU4 signal.

ODU2e to ODU4 - Using PT = 21 Method

Figure 12, Simple Illustration of the ODU2e ⇒ ODU4 Mapping/Multiplexing scheme.  

Click HERE or Click on the figure above to learn more about this Mapping/Multiplexing scheme.  (*).


  • ODU3 ⇒ ODTU4.31 ⇒ ×2 ⇒ ODTUG4 ⇒ OPU4 ⇒ ODU4

This scheme will allow one to map/multiplex as many as 2 ODU3 signals into an ODU4 signal.

ODU3 to ODU4 - Using PT = 21 Method

Figure 13, Simple Illustration of the ODU3 ⇒ ODU4 Mapping/Multiplexing scheme.

Click HERE or Click on the figure above to learn more about this Mapping/Multiplexing scheme.  (*).


  • ODUflex ⇒ ODTU4.ts ⇒ ×80/ts ⇒ ODTUG4 ⇒ OPU4 ⇒ ODU4

This scheme will allow one to map/multiplex anywhere from 1 to 80 ODUflex signals into an ODU4 signal.

ODUflex to ODU4 - Using PT = 21 Method

Figure 14, Simple Illustration of the ODUflex ⇒ ODU4 Mapping/Multiplexing scheme.  

Click HERE or Click on the figure above to learn more about this Mapping/ Multiplexing scheme.  (*).

NOTE:  (*) – Indicates that you must be a member of THE BEST DARN OTN TRAINING PRESENTATION…PERIOD!!  program to see this link.

In Conclusion

In this posting, we briefly listed the characteristic of a PT = 21 scheme for Mapping/Multiplexing multiple lower-speed ODUj tributary signals into a higher-speed ODUk server signal.

We have also listed out each of the 14 PT = 21 schemes for Mapping/Multiplexing multiple lower-speed ODUj signals into a higher-speed ODUk signal.

Please check out the relevant post for similar information on PT = 20 schemes on Mapping/Multiplexing multiple lower-speed ODUj signals into a higher-speed ODUk signal.

Has Inflation got You Down? Our Price Discounts Can Help You Beat Inflation and Help You Become an Expert on OTN!! Click on the Banner Below to Learn More!!!

Discounts Available for a Short Time!!

For More Information on OTN Posts in this Blog, click on the Image below.

OTN Related Blog

OTN Related Topics within this Blog

OTN Related Topics within this Blog General Topics Consequent Equations - What are they and How can you use them? ...

What is the PTE for OTN Applications?

This post defines and describes the Path and Path Terminating Equipment for OTN Applications.

What is Path Terminating Equipment (PTE) for OTN Applications?

Whenever we discuss the OTN Digital Layers (e.g., the OPUk, ODUk, and OTUk layers), we can group Networking Circuits and Equipment into two broad categories.

I will be using these terms throughout various OTN-related posts within this blog.  Thus, we must have a strong understanding of these terms.

I have devoted this blog post to discussing PTE (Path Terminating Equipment).

I have devoted another post to STE (Section Terminating Equipment).

You can also find a detailed discussion of PTEs and STEs within Lesson 3 of THE BEST DARN OTN TRAINING PRESENTATION…PERIOD!!!  This discussion also describes the differences between PTEs and STEs.

What is the Path?

Before we define the term Path Terminating Equipment (or PTE), we must first explain the word Path as it pertains to an Optical Transport Network (OTN).

For OTN applications, there are two different types of Paths.

  • A Non-OTN Client Signal Path (for Non-Multiplexed ODU traffic) and
  • An ODUk Server Signal Path (for Multiplexed ODU traffic)

We will define each of these types of Paths below.

Non-OTN Client Signal Path

When transporting a single non-OTN client signal (such as 100GBASE-R) over OTN (e.g., an ODU4/OTU4 signal in this case), the Path begins where the circuitry maps the 100GBASE-R signal into an OPU4 signal.

We can say that the 100GBASE-R signal officially enters the OTN at this point.

This Path ends at the location where the circuitry de-maps the 100GBASE-R signal from the OPU4 signal (and exits the OTN) at the other end of the network.

Figure 1 presents a simple illustration of an OTN that contains some Path Terminating Equipment and some STEs.

Difference between Section Termination Equipment and Path Terminating Equipment

Figure 1, Illustration of both PTE (Path Terminating Equipment) and STE (Section Terminating Equipment) within an Optical Transport Network

In Figure 1, we show that a Source PTE is mapping a 100GBASE-R signal into an OTU4 signal on the left-hand side of Figure 1.

The OTU4 signal transports this 100GBASE-R signal throughout this OTN and through various Section Terminating Equipment blocks labeled STE#1, STE#2, and STE#3.

Afterward, the OTU4 signal finally arrives at the Sink PTE on the right-hand side of Figure 1.

The Sink PTE then de-maps the 100GBASE-R signal from this OTU4 signal.

In the case of Figure 1, the Path (for the 100GBASE-R signal) is that portion of the OTN that exists between the Source PTE (on the left-hand side of Figure 1) and the Sink PTE (on the right-hand side of the same figure).

As this 100GBASE-R signal travels from the Source PTE to the Sink PTE, it will pass through multiple Sections and STEs (we describe in another post).  The Path is the route the 100GBASE-R signal takes (through the OTN, via the OTU4 signal).

A Closer Look at the Non-OTN Client SIGNAL Path

Now that we have a basic understanding of what a Path is, let’s take a much closer look at the Path.

Figure 2 presents a more detailed illustration of the Non-OTN Client Signal path within an OTN.  This figure also indicates where this Path begins and ends within the OTN.

100GbE/OTU4 Path - Path Terminating Equipment

Figure 2, A Closer Look at the Non-OTN Client Signal Path

Once again, Figure 2 shows that the Non-OTN Client Signal Path begins when we map the client signal into an OPU4 signal (and then an ODU4 and OTU4 signal).

In this case, we are mapping a 100GBASE-R client signal into an OPU4 signal at the OPU4 Mapper block.

This figure also shows that this same Path ends where we de-map that same client signal from the OPU4 signal (at the OPU4 De-Mapper block on the lower-right-hand side of Figure 2).

Please note that the diagram in Figure 2 is functionally equivalent to that in Figure 1.  In Figure 1, we referred to each signal (between the STE and PTE boxes) as OTU signals.  We did not discuss these signals at the OPU4 or ODU4 layers, as shown in Figure 2.

For more details on how we map a 100GBASE-R signal into an OPU4 (and ODU4) server signal, please see Lesson 4 within THE BEST DARN OTN TRAINING PERIOD!!

Let’s now move on to the other type of Path.

Clueless about OTN? We Can Help!!! Click on the Banner Below to Learn More!!!

Corporate Discounts Available!!!

The ODUk Server Signal Path (for Multiplexed ODU Signals)

Another type of OTN Path is the ODUk Server Signal Path.

In the ODUk Server Signal Path, we can map and multiplex multiple lower-speed ODUj tributary signals into a Higher-Speed ODUk server signal (where k > j).

We describe the exact procedure for mapping/multiplexing lower-speed ODUj signals into a higher-speed ODUk signal in other posts.

Figure 3 illustrates a Unidirectional Network that contains both a Non-OTN Client Signal and the ODUk Server Signal set of paths.

1GbE to ODU0 to ODU4 - Path Terminating Equipment

Figure 3, A Closer Look at the ODUk Server Path

NOTE: We described the Non-OTN Client Signal path earlier in this post.  Hence, the reader should be familiar with this particular type of Path.

Handling the 1000BASE-X/OPU0/ODU0 Signals

In Figure 3, we have a 1000BASE-X (1GbE) signal that we first map into an OPU0 signal (in the Upper-Left-Hand corner of this figure).

We earlier stated that this point of mapping a non-OTN signal (such as a 1000BASE-X signal) into an OTN signal (e.g., an OPU0 in this case) is the beginning of the Non-OTN Client Signal Path.

Once we’ve mapped this signal into an OPU0, then we will also, in turn, map this OPU0 signal into an ODU0 signal.

Afterward, this ODU0 signal goes through some different processes (that we discuss in detail in other posts) before we map/multiplex this ODU0 tributary signal into an OPU4 signal.

Once we’ve mapped the ODU0 tributary signal (along with 79 other such signals) into an OPU4 signal, this point serves as the entry point for the ODU0 to OPU4/ODU4 Path.  We can also call this the ODUk Server Signal Path entry point.  

Figure 3 labeled this point as the ODU0 to OPU4 Path Demarcation Line.

This is where this OPU4 signal begins (and serves as the starting point for this particular Path).

Handing the OPU4/ODU4 Server Signal

We then quickly map this OPU4 signal into an ODU4 signal and then (eventually) into an OTU4 signal.

Afterward, we convert this OTU4 signal into an optical signal and transmit it through three additional sets of STEs before arriving at the XCVR and Optical I/F at the Remote Terminal (in the lower-left-hand corner of Figure 3).  

The remote terminal converts this signal back into the electrical format and terminates the OTU4 and ODU4 signals.

Finally, the circuitry routes the resulting OPU4 signal to the OPU4 De-Mapper block.  The OPU4 De-Mapper block then terminates this OPU4 signal.

This point serves as the OPU4 to the ODU0 Path Demarcation point.  This point is where this OPU4 signal (and its Path) ends.  We can also say that this is the end of the ODUk Server Signal Path.  

NOTE:  If you wish to learn more about how we map/multiplex lower speed ODUj tributary signals into an ODU4 Server signal, then you can check out Lesson 5 within THE BEST DARN OTN TRAINING PERIOD!!!

This circuitry will then de-map out the ODU0 tributary signal (of interest) along with as many as 79 other ODU0 tributary signals from this OPU4 signal.

Next, the ODU0 Terminator block will terminate this ODU0 signal and extract the OPU0 signal.

Afterward, it will transmit this data to the OPU0 De-Mapper block.

The OPU0 De-Mapper block will then de-map out the 1000BASE-X (1GbE) client signal from its incoming OPU0 signal.

Once the OPU0 De-Mapper block de-maps the 1000BASE-X signal from the OPU0 signal, this point serves as the Non-OTN Client Path Demarcation point.

In other words, this is the point at which this particular OPU0 signal (and its Path) ends.

How the PTE Operates in the Optical Transport Network

For OTN applications, the ODUk Layer is the protocol layer responsible for managing and monitoring the transmission/reception of data across a Path.

Path Termination Equipment will process data (in the electrical format) by doing many of the following functions:

In the Transmit Direction

  • Mapping data (either Non-OTN client data or lower-speed ODUj tributary data) into an OPUk signal and generating the new OPUk signal and overhead.
  • Generating the ODUk overhead or the ODUk-PMOH (Path Monitoring Overhead) and attaching the ODUk-PMOH to each outbound OPUk frame.
  • Sending this data downstream, the circuitry will either map this signal into another higher-speed ODUk signal or an OTUk frame and precondition it for transmission across the optical fiber.

NOTE:  Throughout many of the postings on this blog, we will refer to this ODUk overhead data as the ODUk-PMOH (ODUk-Path Monitoring Overhead) data.

In the Receive Direction

  • Receive ODUk data from the upstream OTUk Framer block
  • Process and Terminate the ODUk overhead (or ODUk-PMOH).  While the PTE is processing the ODUk-PMOH, it will check for the following errors and defects within the incoming ODUk signal.
    • Defects or Failures (e.g., dTIM, dPLM, dDEG, dAIS, dOCI, dLCK and PM-BDI)
    • Errors (e.g., PM-BIP-8, PM-BEI)
  • Terminate the OPUk data stream and de-map either the Non-Client OTN signal or some lower-speed ODUj tributary signals.
  • Route the de-mapped data downstream for further processing.

Mapping Data (either Non-OTN client data or lower-speed ODUj tributary data) into an OPUk/ODUk signal

Anytime the PTE maps data (be it non-OTN client data or lower-speed ODUj tributary signals) into an OPUk signal, it will do so by using some of the following mapping procedures.

As the PTE uses one of these mapping procedures to load client data into the OPUk payload, it will load its mapping parameters into the OPUk overhead.

The PTE will also alert the network of the type of traffic that it is transmitting via this OPUk signal by sending the appropriate PSI message via the PSI byte.

Please see the relevant posts for more information on this functionality.

Generating the ODUk Overhead (ODUk-PMOH)

As the PTE receives an OPUk data stream from upstream circuitry, it will precondition all this data for transport through the Path by computing and attaching the ODUk overhead fields to each outbound OPUk frame.

In particular, the PTE will attach some ODUk-PMOH fields to the OPUk frame, which will help it to detect errors and declare and clear certain defect conditions.

Other ODUk overhead fields support maintenance/monitoring features such as Tandem Connection Monitoring, the transport of APS (Automatic Protection Switching) Commands, and other forms of Equipment to Equipment (non-client related) commands and information.

In other posts, we will discuss these topics (e.g., Tandem Connection Monitoring and the APS Channel).

The critical thing to note at this point is that the PTE will use the ODUk-PMOH to monitor the overall health of the entire Path (from the point where it creates the ODUk signal to the end where it terminates this signal).

Figure 4 presents an illustration of the ODUk Overhead that the PTE will use to support the monitoring of this signal as it travels through the Path.  NOTE:  The ODUk-PMOH is the orange PM field within Figure 4.  We will discuss the PMOH in another post.  

ODU Frame with ODU Overhead Shown

Figure 4, ODUk Overhead, PMOH, and Payload fields

NOTE:  Please see the ODUk Frame post for more information on the ODUk frames and the PMOH fields.

Terminating the OPUk Overhead

After the OTUk signal has been converted into the optical format, received, and converted back into the electrical domain (by the remote terminal), the remote terminal will terminate the OTUk signal (because this equipment is an STE).

Once the STE has terminated OTUk-SMOH, it will route the resulting ODUk signal towards downstream circuitry for further processing.

At this point, the PTE will proceed to terminate the ODUk-PMOH.

As the PTE performs this task, it will check the ODUk-PMOH for the occurrence of bit errors and defects.

The PTE will report the occurrences of such errors and defects to System Management.

Additionally, the PTE will remove all ODUk-PMOH data from this incoming stream (which leaves us with just an OPUk data stream now).

This OPUk data stream is then routed to a De-Mapper block for further processing.

Important Takeaway

The critical takeaway is that the PTE will rely on the ODUk-PMOH data (as shown in Figure 4) to process, manage, and ultimately terminate the ODUk stream.

NOTE:  Each ODUk signal (whether it is a lower-speed ODUj tributary signal that we map/multiplex into a higher-speed ODUk server signal) or an ODUk signal (that is carrying a single Non-OTN client signal) will have its ODUk-PMOH data.

This means that PTE (whether it is for transporting a single Non-OTN client signal or one of many lower-speed ODUj signals) will manage and monitor its own respective ODU signal.

I have redrawn Figure 2 to show where the circuitry generates and terminates/monitors the ODU4-PMOH within the Non-OTN Client Path (of 100GBASE-R over OPU4/ODU4).  

I have included this figure below in Figure 5.

100GbE to OTU4 PTE w/ ODU4-PMOH

Figure 5, Illustration of the 100GbE to ODU4 Path.  (The Entire ODU4 Path is shaded).  

NOTE:  I have highlighted the locations where the Path Circuitry Generates and Monitors/Terminates the ODU4-PMOH (Non-OTN Client ODU4).

This also means that the circuitry (shown above in Figure 3) would require as many as 81 sets of PTE.

  • 80 sets of PTE would be required to monitor each of the 80 ODU0 signals (that we are transporting via the OPU4/ODU4 signal), and
  • One additional PTE would be required to monitor the more significant ODU4 signal.

I have also redrawn Figure 3 to show where the circuitry generates and terminates/monitors the ODU0-PMOH within the Non-OTN Client Path (of 1000BASE-X over OPU0/ODU0).  

I have included this figure below in Figure 6.

1GbE to ODU0 to ODU4 - ODU0 SMOH Termination

Figure 6, Illustration of the 1GbE to ODU0 -> ODU4 Path.  (The entire ODU0 Path is shaded).

NOTE:  In Figure 6I have highlighted the locations where the Path Circuitry Generates and Monitors/Terminates the ODU0-PMOH (Non-OTN Client ODU0).  

Finally, I have redrawn Figure 3 (again) to show where the circuitry generates and terminates/monitors the ODU4-PMOH within the ODU0 mapped/multiplexed into OPU4/ODU4 Path.   

I have included this figure below in Figure 7.

1GbE to ODU4 with ODU4-PMOH

Figure 7, Illustration of the 1GbE to ODU0 -> ODU4 Path.   (The Entire ODU4 Path is shaded).

NOTE:  I have highlighted the Locations where the Path Circuitry Generates and Monitors/Terminates the ODU4-PMOH (ODU0 Mapped/Multiplexed into OPU4/ODU4).

De-Mapping the Client Signal from the OPUk Payload

Once the OPUk has reached the De-Mapper block, the De-Mapper block will de-map out the client data (be it non-OTN client data or lower-speed ODUj tributary signals) using the mapping parameters that the Source PTE loaded into the OPUk overhead bytes (when it was mapping these clients into the OPUk signal).

This point will be the “end of the line’ for the OPUk frame and overhead.

This circuitry will send the client data downstream for further processing (either by non-OTN system-side circuitry, such as a MAC or other PTE circuitry to handle the lower speed ODUj signals).

Examples of PTE

  • Line Cards or Transceivers take (for instance) 100GBASE-R data from a MAC and transport this data over an OTU4 connection (and vice-versa).
  • Any equipment that performs ODUj switching and grooming
  • ROADMs.

Some Final Comments about the ODUk-PMOH and PTE Equipment.

This post introduced the concept of a Path, Path Terminating Equipment (PTE), and the ODUk-PMOH (Path Monitoring Overhead).

In another post, I describe the Section, Section Terminating Equipment (STE), and the OTUk-SMOH (Section Monitoring Overhead).

STEs will use the OTUk-Layer to manage the data transmission across Sections.

STEs will only generate and process OTUk-SMOH data.  They do not process ODUk-PMOH data AT ALL.

Likewise, PTEs will use the ODUk-Layer to manage data transmission across a Path.

PTEs will only generate and process ODUk-PMOH data.  They do not process OTUk-SMOH data AT ALL.  In most cases, the PTE will not even see the OTUk-SMOH data.

Has Inflation got You Down? Our Price Discounts Can Help You Beat Inflation and Become an Expert on OTN!! Click on the Banner Below to Learn More!!!

Discounts Available for a Short Time!!

For More Information on OTN Posts in this Blog, click on the Image below.

OTN Related Blog

OTN Related Topics within this Blog

OTN Related Topics within this Blog General Topics Consequent Equations - What are they and How can you use them? ...

What is the ODUk-LCK Maintenance Signal?

This post defines and describes the ODUk-LCK (Locked) Indicator for OTN applications.


What Is the ODUk-LCK Maintenance Signal?

LCK is an abbreviation for Locked Indicator.

OTN Network Equipment will often transmit the ODUk-LCK (Locked) maintenance signal to indicate that this particular OTN interface has been administratively locked-out and is now unavailable to user traffic.

In other words, if the system operator decides to lock out (or prevent OTN traffic from flowing through) a given OTN interface, then the system will transmit the ODUk-LCK maintenance signal as a replacement signal through that OTN interface.

Whenever an OTN Network Equipment (NE) transmits an ODUk-LCK maintenance signal, it generates and transmits a framed repeating “0101 0101” pattern within the entire ODUk signal.

If we were to map the ODUk-LCK Maintenance signal into an OTU data stream, the Source STE would transmit a series of OTUk frames in which the FAS, MFAS, and OTUk Overhead fields are all valid.  The rest of the OTUk frame (e.g., the ODUk/OPUk portion of the frame) will consist of a repeating 0101 0101 pattern.

The Source STE will compute the FEC field based on the contents within these OTUk frames.

Figure 1 shows a drawing of an OTUk frame transporting the ODUk-LCK maintenance signal.

Figure 1, Illustration of an ODUk-LCK signal within an OTUk frame

What are the timing/frequency requirements for the ODUk-LCK Maintenance signal?

The Source STE will need to transmit this indicator at the same nominal bit rate for an ordinary OTUk signal.

Like any OTUk signal, the Source STE will need to transmit this data at the nominal bit-rate  ±20ppm.

Table 1 presents the nominal bit-rates for the OTUk signals (and, in turn, for the OTUk signal, whenever it is transporting the ODUk-LCK indicator) for each value of k.

Table 1, Required Bit Rates for the OTUk Signal – when transporting the ODUk-LCK signal.

OTUk Bit Rate and OTUk Frame Period

When would OTN Network Equipment transmit/generate the ODUk-LCK Maintenance signal?

Earlier, I mentioned that the Network Equipment would transmit the ODUk-LCK signal via an OTN Interface signal when the system operator has locked-out system users’ OTN traffic from using this particular OTN interface.

The ODUk-LCK maintenance signal will replace OTN traffic, which the system operator has locked out intentionally from this particular OTN interface.

The ODUk-LCK maintenance signal is similar to the ODUk-OCI and ODUk-AIS maintenance signals.  All three of these maintenance signals are replacement signals for actual OTN traffic.

However, the NE will transmit the ODUk-OCI indicator whenever the OTN traffic is missing because the system configuration has removed the OTN traffic upstream.

The NE will transmit the ODUk-AIS indicator whenever the intended OTN traffic is missing due to a service-affecting defect upstream.

The NE will transmit the ODUk-LCK indicator via an OTN interface whenever the OTN traffic is missing.  The system operator has locked out that particular OTN interface from all other OTN traffic.

One practical example of an OTN NE transmitting the ODUk-LCK indicator would be when the system operator has configured a particular port (or OTN interface) to operate in some diagnostic or loopback mode.

How does a Receive Terminal detect and declare the dLCK (ODUk-LCK) defect condition?

The Receiving NE (or Sink PTE) that is receiving the ODUk-LCK maintenance signal will declare the dLCK defect condition whenever it gets a STAT field value of [1, 0, 1] within three (3) consecutive OTUk/ODUk frames.

NOTE:  The STAT field is a 3-bit field that resides within the PM (Path Monitor) byte-field in the ODUk overhead.

This 3-bit field will have the value [1, 0, 1] because the NE overwrites the ODUk overhead with the repeating “0101 0101” pattern whenever it transmits the ODUk-LCK maintenance signal.

Please see the ODUk Frame post for more information about the STAT field.

How does a Sink PTE clear the dLCK defect condition?

The Sink PTE will clear the dLCK defect condition whenever it has accepted a STAT field value of something other than “[1, 0, 1]”.

NOTE:  The Sink PTE should accept a new STAT field value if it receives at least three (3) consecutive ODUk frames that contain a consistent STAT field value.

Has Inflation got You Down? Our Price Discounts Can Help You Beat Inflation and Become an Expert on OTN!! Click on the Banner Below to Learn More!!!

Discount Available for a Short Time!!

For More Information on OTN Posts in this Blog, click on the Image below.

OTN Related Blog

OTN Related Topics within this Blog

OTN Related Topics within this Blog General Topics Consequent Equations - What are they and How can you use them? ...

What is the ODUk-OCI Maintenance Signal?

This post defines and describes the ODUk-OCI (Open Connection Indication) signal.


What exactly is an ODUk-OCI Maintenance Signal?

OCI is an acronym for Open Connection Indicator.

OTN network equipment will often transmit the ODUk-OCI (Open Connection Indicator) Maintenance Signal to indicate that this particular OTN interface is not connected to an upstream signal (or trail termination source).

In other words, if the system configuration does not connect actual OTN traffic to an OTN interface, then the system will transmit the ODUk-OCI Maintenance signal as a replacement signal through that OTN Interface.

Whenever an OTU Network Equipment (NE) transmits an ODUk-OCI Maintenance signal, it generates and transmits a framed repeating “0110 0110” pattern within the entire ODUk signal.

More specifically, the OTN NE will generate/transmit a series of OTUk frames in which the FAS, MFAS, and OTUk Overhead fields are all valid, and the rest of the OTUk frame (e.g., the ODUk/OPUk portion of the frame) will consist of a repeating 0110 0110 pattern.

The NE will compute the FEC field based on the contents within these OTUk frames.

Figure 1 shows a simple drawing of an OTUk frame transporting the ODUk-OCI Maintenance signal.

ODUk-OCI indicator

Figure 1, Simple Illustration of an ODUk-OCI Maintenance signal within an OTUk frame

What are the timing/frequency requirements for an ODUk-OCI Maintenance signal?

The OTN NE will need to transmit this indicator at the same nominal bit rate for an ordinary OTUk signal.

Like any other OTUk signal, the OTN NE will need to transmit this data at the nominal bit-rate ±20ppm.

Table 1 presents the nominal bit-rates for the OTUk signals (and, in turn, for the OTUk signal, whenever it is transporting the ODUk-OCI Maintenance Signal) for each value of k.

Table 1, Required Bit Rates for the OTUk Signal – when transporting the ODUk-OCI Maintenance signal.

OTUk Bit Rate and OTUk Frame Period

When would OTN Network Equipment transmit/generate an ODUk-OCI signal?

Earlier, I mentioned that Network Equipment would transmit the ODUk-OCI Maintenance signal via an OTN Interface signal when the system configuration has NOT connected upstream traffic to this OTN interface.

The ODUk-OCI Maintenance signal will replace OTN traffic that was intentionally disconnected from this particular OTN interface.

The ODUk-OCI Maintenance signal is similar to the ODUk-AIS and ODUk-LCK Maintenance signals.  These three signals/indicators serve as replacement signals for actual OTN traffic.

However, the NE will transmit the ODUk-AIS indicator whenever the intended OTN traffic is missing due to a service-affecting defect upstream.

The NE will transmit the ODUk-LCK indicator whenever the OTN traffic is missing because the system operator has administratively locked out that particular OTN interface from all other OTN traffic.

Finally, the NE will transmit the ODUk-OCI maintenance signal whenever the OTN traffic is missing due to user configuration/provisioning (and not because of administrative lock-out).

One practical example of an OTN NE transmitting the ODUk-OCI indicator would be when an OTN traffic signal is not connecting a traffic signal to an OTN interface in an Optical Cross-Connect system.

How does a Receive Terminal detect and declare the dOCI (ODUk-OCI) defect condition?

The Receiving NE (or Sink PTE) that is downstream from the NE, which is transmitting the ODUk-OCI Maintenance signal, will detect and declare the dOCI defect condition whenever it receives a STAT field value of “1, 1, 0” within three (3) consecutive OTUk/ODUk frames.

NOTE:  The STAT field is a 3-bit field that resides within the PM (Path Monitor) byte-field in the ODUk overhead.

This 3-bit field will have the value [1, 1, 0] because the NE overwrites the ODUk overhead with the repeating “0110 0110” pattern whenever it transmits the ODUk-OCI indicator.

Please see the ODUk Frame post for more information about the STAT field.

How does a Sink PTE clear the dOCI defect condition?

The Sink PTE will clear the dOCI defect condition whenever it has accepted a STAT field value of something other than “[1, 1, 0]”.

NOTE:  The Sink PTE should accept a new STAT field value if it receives at least three ODUk frames that contain a consistent STAT field value.

Using the ODUk-OCI Maintenance Signal in Protection-Switching Applications

1:N and ODUk Shared-Ring Protection-Switching Systems will sometimes transport the ODUk-OCI Maintenance Signal through the Protection Transport entity (instead of the Extra-Traffic Signal) whenever we are not using the Protection Transport entity to carry the Normal Traffic Signal.

Has Inflation got You Down? Our Price Discounts Can Help You Beat Inflation and Become an Expert on OTN!! Click on the Banner Below to Learn More!!!

Discount Available for a Short Time!!

For More Information on OTN Posts in this Blog, click on the Image below.

OTN Related Blog

OTN Related Topics within this Blog

OTN Related Topics within this Blog General Topics Consequent Equations - What are they and How can you use them? ...

What is 1:N Protection Switching?

This post defines and describes the 1:n Protection Switching architecture.

What is the 1:n Protection Switching Architecture?

ITU-T G.808 defines the “1:n (protection) architecture (n >= 1) as:

A 1:n protection architecture has n normal traffic signals, n working transport entities, and one protection transport entity.  

It may have an extra traffic signal.  

At the source end, a normal traffic signal is either permanently connected to its working transport entity and may be connected to the protection transport entity (in the case of a broadcast bridge) or is connected to either its working or protection transport entity (in the case of a selector bridge).  

The sink-end can select the normal traffic signal from either the working or the protection transport entity.  

An unprotected extra traffic signal can be transported via the protection transport entity whenever the protection transport entity is not used to carry a normal traffic signal.

What Does All This Mean?

As for all Protection Groups, a 1:n Protection Architecture consists of the following elements:

  • n instances of the Head-End (or Source-End)
  • n instances of the Tail-End (or Sink-End)
  • and n separate Normal Traffic Signals
  • n sets of Working Transport entities
  • a single Protect Transport entity
  • a single Extra Traffic Signal
  • Protection Switching Controller (that can detect and declare defects within the Normal Traffic Signals).
  • An APS Communications Link/Protocol (Required)

Figure 1 shows a variation of the 1:n Protection Switching architecture.

In this case, we show a 1:2 Protection Switching Architecture.

Basic Drawing of a 1:2 Protection Switching Scheme

Figure 1, Illustration of a 1:2 Protection Switching Architecture

This figure shows that a Broadcast Bridge realizes each of the two Head-Ends (of this Protection Group).  We realize each of the two Tail-ends by a Selector Switch.

I have designated the Broadcast Bridges with the Blue Overlay Shading in this figure.

Likewise, I have designated the Selector Switches with the Red Overlay shading.

NOTES:  

  1. The user can also opt to realize the Head-ends with a Selector Switch for the 1:n Protection Switching Architecture.
  2. Figure 1 includes some other bells and whistles (in the form of some additional Selector Switches) that I will discuss later in this blog.

Clueless about OTN and Protection Switching? We Can Help!!! Click on the Banner Below to Learn More!!

Corporate Discounts Available!!!

How does the 1:n Protection Switching Architecture Work?

One of the noteworthy features of a 1:n Protection Switching Architecture is that you have a single Protection Transport entity that protects n Normal Traffic Signals.

This means that for the 1:n Protection Switching Architecture, you only need 1/n more bandwidth to transport the n Normal Traffic Signals in a protected manner, from the Head-ends to the Tail-ends (where n is the total number of Normal Traffic Signals that you are transporting via this Protection Group).

In contrast, for a 1+1 Protection Switching Architecture, you have one Protection Transport entity protecting one Normal Traffic Signal.

This means that we are providing the Normal Traffic Signal with twice the bandwidth required to transport this signal from the Head-End to the Tail-End in a protected manner.

For many applications, this is inefficient, expensive, and inconvenient.

Of course, this same ratio would also hold if you used a 1:1 Protection Switching Architecture.

Another Key Characteristic of a 1:N Protection Architecture

Another critical characteristic of a 1:N Protection Architecture is the use of Broadcast Bridges on the Head-End Circuitry.  In contrast to a Permanent Bridge, during No-Defect Operation, there will not be a hardwired connection between the Normal Traffic Signal and the Working and Protection Transport entities.  There is only the connection between the Normal Traffic Signal and the Working Transport Entity.  When we are required to perform Protection-Switching, we will close the Broadcast Bridges and complete the electrical connection between the Normal Traffic Signal and the Protection Transport entity.  

We will discuss how the 1:n Protection Switching Architecture works by examining the following cases/conditions.

  • The Normal (No Defect) Case
  • A service-affect defect occurring Working Transport entity # 1
  • Protection Switching (after the defect has been declared).
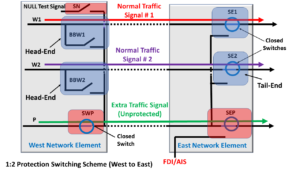
  • The Normal (No Defect) Case – also using the Extra Traffic Signal

The Normal (No Defect) Case

Figure 2 shows a drawing of the Normal (No Defect) Case.

In this case, we have two Network Elements that are exchanging data with each other.

One Network Element (which we labeled Network Element West) is transmitting data to another Network Element (which we labeled Network Element East).

In most actual applications, we would also have traffic going in the opposite direction (East to West).

But, to keep these figures simple, we are only showing one direction of traffic in each of the figures in this post.

In Figure 2, Normal Traffic Signal # 1 travels over Working Transport entity # 1.

Likewise, Normal Traffic Signal # 2 travels over Working Transport entity # 2.

Additionally, the Extra Traffic Signal is traveling over the Protection Transport entity.

There are no impairments on any of the Working Transport entities, and everything is expected in this case.

1:2 Protection Switching Scheme - Normal Condition - Extra Traffic Signal

Figure 2, Illustration of the Normal (No Defect) Case 

A Service-Affecting Defect occurs in Working Transport entity # 1

Now, let us assume that an impairment occurs in Working Transport entity # 1, such that some circuitry (sitting within the Tail-End of this Working Transport entity, within Network Element East) is declaring either a service-affecting defect such as SF (Signal Fail) or the signal degrade defect, such as SD (Signal Degrade).

In this case, Normal Traffic Signal # 1 can no longer travel on the Working Transport entity # 1.

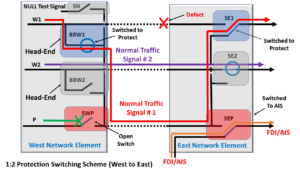
Figure 3 shows a drawing of this condition.

1:2 Protection Switching Scheme - Defect in Working Transport entity # 1

Figure 3, Illustration of a Service-Affecting Defect Occurring in Working Transport Entity # 1

Protection Switching – After the Defect (in Working Transport Entity # 1) has been declared

Now, since the Tail-End circuitry of Working Transport entity # 1, within Network Element East) has declared this defect condition, it needs to invoke Protection Switching.

In particular, this circuitry needs to perform the following four tasks.

  1. The circuitry within Network Element East needs to switch the local Selector Switch, which I’ve labeled SE1 (at the Tail-End of Working Transport entity # 1), away from this (now failed) Working Transport entity over to selecting the Protection Transport entity.
  2. The Network Element East circuitry also needs to send a command across the Transport entities back to the upstream Network Element (e.g., Network Element West).  In this case, Network Element East will also command Network Element West to invoke Protection Switching (for Working Transport entity # 1).
  3. Next, Network Element West (after it has received this command from Network Element East) then needs to command the Broadcast Switch, which I’ve labeled BBW1 (at the Head-end of Working Transport Entity # 1) to switch such that Normal Traffic Signal # 1 is now also connected to the Protection Transport entity.
  4. Finally, Network Element West needs to pre-empt the Extra Traffic signal by opening the switch that I’ve labeled SWP.  Once this switch is OPEN, the Extra Traffic signal will no longer travel across the Protection Transport entity.

In this case, Normal Traffic Signal # 1 will now travel (from Network Element West to Network Element East) using the Protect Transport entity.

Figure 4 presents the resulting configuration (with Network Elements East and West) after protection switching.

1:2 Protection Switching Scheme - Protection EventFigure 4, Illustration of our 1:2 Protection Switching Protect Group, following Protection Switching

NOTE:  Protection Groups using the 1:n Protection Switching scheme are required to support an APS Communications Channel to command and coordinate Protection Switching activities between the Head-ends and Tail-ends of the Protection Group.

This is how 1:N Protection Switching works.

Has Inflation got You Down? Our Price Discounts Can Help You Beat Inflation and Help You Become an Expert on OTN and Protection Switching!!! Click on the Banner to Learn More!!

Discounts Available for a Short Time!!

Additional Options in the 1:n Protection Switching Architecture

There are several options that users can use when designing a 1:n protection switching scheme.

Some of these options include:

  • Transmitting the NULL Signal during the Normal (No Defect) Case – as the Extra Traffic signal.
  • Transmitting the FDI/AIS signal during Protection Switching
  • Revertive Protection Switching
  • Unidirectional or Bidirectional protection switching

We will briefly discuss each of these options below.

Transmitting the NULL Signal during the Normal (No Defect) Case – as the Extra Traffic Signal.

In some cases, the user can transmit the NULL signal as the Extra Traffic signal (via the Protect Transport entities) anytime each of the n Working Transport entities is defect-free and is functioning properly.

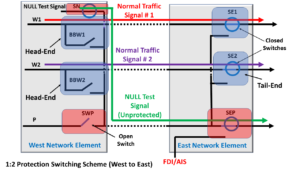
In the Protection Group (discussed in this post), we could close the Switch labeled SN and open the Switch labeled SWP (within Network Element West).

This configuration setting would allow the NULL signal (that originates from Network Element West) to flow through the Protect Transport entity, as shown in Figure 5.

1:2 Protection Switching Sceme - Normal with NULL Signal

Figure 5, Transmitting the NULL Signal via the Protect Transport Entity, during Standby Times.  

Transmitting the FDI/AIS signal during Protection Switching

In many cases, the user will transmit the FDI/AIS signal towards the circuitry downstream from Network Element East by switching the switch, which I’ve labeled SEP (within Network Element East), away from the Protect Transport entity towards the FDI/AIS signal source.

Figure 4 (above) shows Network Element East transmitting the FDI/AIS indicator towards downstream traffic during Protection Switching.

The user would typically only do this whenever the Extra Traffic Signal (e.g., the NULL signal or some other low-priority signal) has been pre-empted due to a Protection Switching event.

The purpose of transmitting this FDI/AIS signal is to alert downstream equipment of a service-affecting defect condition within one of the Working Transport entities between Network Elements East and West.

NOTE:  For OTN applications, the Network Element will transmit the ODUk-AIS indicator during these protection switching events.

Revertive Protection Switching

Some Protection Groups will support Revertive operations, and others will not.

Suppose you designed a Protection Group to support Revertive operations.  In that case, the Protection Group will automatically reroute the affected Normal Traffic Signal back through its Working Transport entity shortly after the servicing-affecting defect (which caused the protection switching event in the first place) has cleared.

1:n Protection Switching systems typically support Revertive operations, whereas 1+1 Protection Switching systems may NOT support Revertive operations.

If a 1:n Protection Switching system was to support Revertive operations, then the Network Element that first declared (and is now clearing) the service-affecting defect; would have to send a command back to the other (remote) Network Element to coordinate revert protection switching activities (between both the Head-Ends and Tail-Ends of the Protection Group).

Please see the post on the Revertive Operation and the Automatic Protection Switching Channel for more details on this topic.

Unidirectional or Bidirectional Protection Switching

A 1:n Protection Switching scheme can support either Unidirectional or Bidirectional Protection Switching.

If the Protection Group supports Unidirectional Protection Switching, then the Network Element (that detects and declares the Service-Affecting defect within one of the Working Transport entities) will need to send the necessary command information (back to the upstream Network Element) to command and coordinate the Unidirectional Protection Switching event.

Conversely, suppose the Protection Group supports Bidirectional Protection Switching.  In that case, the Network Element (that detects and declares the Service-Affecting defect) will need to send the necessary command information (back to the upstream Network Element) to command and coordinate the Bidirectional Protection Switch.

Please see the posts for Unidirectional and Bidirectional Protection Switching for more details on this topic.

Has Inflation got You Down? Our Price Discounts Can Help You Beat Inflation and Help You Become an Expert on OTN!! Click on the Banner Below to Learn More!!!

Discounts Available for a Short Time!!

Click on the Image Below to see more Protection-Switching related content on this Blog:

Protection-Switching Related Blog

Protection-Switching Related Blog Posts

Protection-Switching Related Blog Posts Basic Protection-Switching Terms Head-End (Source Node) Hold-Off Timer Protection-Group Protection-Transport entity Selector Switch Tail-End (Sink Node) ...

What is the NULL Test Signal for OTN?

This post defines and describes the NULL Signal for OTN (Optical Transport Network) applications.

What is the NULL Test Signal for OTN?

What Exactly is the NULL Test Signal for OTN?

The NULL signal (for OTN) is an OPUk frame with all the following characteristics.

  • The PT (Payload Type) byte-field (within the PSI) is set to the value 0xFD (which indicates that this OPUk frame is transporting the NULL signal).
  • The rest of the 7 RES (Reserved) byte-fields (within the OPUk Overhead) are all set to an All-Zeros pattern (0x00).
  • All the payload bytes (within the OPUk frame) are set in an All-Zeros pattern.

Figure 1 shows a drawing of an OPUk Frame transporting the NULL signal.

OPUk_Frame transporting NULL Signal

Figure 1, An Illustration of the OPUk frame that is transporting the NULL signal

Any ODUk or OTUk frame that transports an OPUk frame with these characteristics carries the NULL signal.

Additionally, any of the following types of OPUk/ODUk signals can transport the NULL signal:

  • OPU0/ODU0
  • OPU1/ODU1
  • OPU2/ODU2
  • OPU2e/ODU2e
  • OPU3/ODU3
  • OPU4/ODU4
  • OPUflex/ODUflex

Clueless about OTN? We Can Help!! Click on the Banner Below to Learn More!!

Corporate Discounts Available!!!

Where and How would one use the NULL Signal?

ITU-T G.709 defines the NULL signal (for OTN) as a test signal.

Therefore, the System Architect can consider the NULL signal as a tool (in the toolbox) for testing and debugging features available to an OTN system.

Some system applications will transmit the NULL signal via the Protection Transport entity within a 1:1 or 1:n protection switching scheme.  In this case, the user will send the NULL signal instead of either the Extra-Traffic Signal or the ODUk-OCI Maintenance Signal.

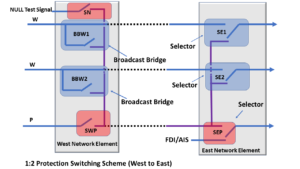
Figure 2 shows a drawing of the 1:2 Protection Switching scheme, in which the user is transporting the NULL signal via the Protection Transport Entity.

1:2 Protection Switching scheme using the NULL Signal

Figure 2, An Illustration of a 1:2 Protection Switching scheme that is transporting the NULL signal via the Protection Transport entity

We can use the NULL signal in any application or situation whenever we need to continuously supply an optical signal (that is carrying timing information) to keep Clock Recovery PLL circuitry (within a downstream Network Element) locked onto the timing signal in the local Network Element.

Simultaneously, the NULL signal will indicate to the downstream Network Element that the connection is working correctly and that there are no defects upstream.

The NULL signal is unlike an AIS signal, which does indicate (to downstream Network Elements) the presence of service-affecting defect conditions upstream.

How Should a System Designer create the NULL Signal for OTN Applications?

The NULL signal (for OTN applications) consists of a fixed pattern.

Therefore, the user can generate OPUk signals (transporting the NULL signal) using a Pattern Generator, which gets its timing from a local clock oscillator.

The System Designer must also ensure that this NULL Signal generator function generates both the OTUk/ODUk Frame and Multi-Frame start indicators.

The Frame Start indicator (FS) should occur every 122,368 clock cycles (or ODUk frame period).

And the Multi-Frame Start indicator (MFS) should occur every 256 frames.

ITU-T G.798 specifies an adaptation function of the name ODUkP/NULL_A_So.

This function is responsible for generating an ODUk signal transporting the NULL signal.

This adaptation function generates the NULL signal from a free-running clock source, which then maps this signal into an OPUk/ODUk frame.

Finally, this function includes the OPUk overhead (e.g., the RES and PT fields) and a default ODUk overhead.

NOTE:  In the case of the default ODUk overhead, this function will set all the ODUk overhead fields to All-Zeros, except for the PM STAT field, which will be set to the value 001 (to indicate a Normal Path Signal).

Figure 3 illustrates the ODUkP/NULL_A_So function from ITU-T G.798.

ODUkP/NULL_A_So function block diagram

Figure 3 illustrates the ODUk/NULL_A_So function from ITU-T G.798.  

What are the Timing (Frequency Accuracy), Jitter, and Wander Requirements for the NULL Signal?

Please see the ODCa (ODU Clock for Asynchronous Mapping) post for the complete Frequency Accuracy and Jitter/Wander requirements of this NULL signal.

Summary

The NULL signal, for OTN applications, is an OPUk frame that has ALL the following characteristics:

  • All the Payload bytes have the value 0x00 (All Zeros).
  • The PT (Payload Type) byte (within the PSI message) has the value of 0xFD (which identifies this particular signal as being the NULL signal)
  • All remaining OPUk overhead fields will be of the value of 0x00 (All Zeros).

Additionally, within the ODUk overhead, the PM STAT field should be set to the value 001.

The NULL signal is a test signal that one can use for test and debugging purposes.

The System Design can also use the NULL signal as a replacement signal for a signal that is unavailable due to user configuration reasons.

Has Inflation got You Down? Our Price Discounts Can Help You Beat Inflation and Help You Become an Expert on OTN!! Click on the Banner Below to Learn More!!

Discounts Available for a Short Time!!

For More Information on OTN Posts in this Blog, click on the Image below.

OTN Related Blog

OTN Related Topics within this Blog

OTN Related Topics within this Blog General Topics Consequent Equations - What are they and How can you use them? ...

What is the Extra Traffic Signal (for APS)?

This post defines and describes the term Extra Traffic Signal, as it is used in a Protection Switching system.


What is the Extra Traffic Signal for APS (Automatic Protection Switching) Purposes?

ITU-T G.808 Defines the Extra Traffic Signal as:
A Traffic signal is carried over the protection transport entity and/or bandwidth when that transport entity/bandwidth is not being used to protect a normal traffic signal, i.e., when the protection transport entity is on standby.  

Whenever the protection transport entity/bandwidth is required to protect or restore the normal traffic on the working transport entity, we will preempt the extra traffic.  

Extra traffic is not protected.

What Does All That Mean?

1:1 and 1:n protection switching schemes often support two types of signals.

The Normal Traffic signal is the high-priority traffic signal that we designed our protection switching scheme to protect.

A Normal Traffic signal will usually travel through a Protection Group (from one Network Element to another) via the Working Transport entity.

What if the Network Declares a Service-Affecting or Signal Degrade Defect Condition with the Working Transport Entity?

However, suppose the Network detects a service-affecting or signal degrade defect within the Working Transport entity.  In that case, the protection group will route the corresponding Normal Traffic Signal through the Protection Transport entity.

The Extra Traffic signal is a lower-priority (and therefore, pre-emptible) traffic signal that will travel through a Protection Group (from one Network Element to another) via the Protection Transport entity whenever it is in standby mode.

In other words, as long as the one (or n) Normal Traffic signals can travel on their Working Transport entities (e.g., the normal condition), then the Extra Traffic signal will use the Protection Transport entity.

The Extra Traffic Gets Dropped

However, suppose the Tail-End circuitry (within the Protection Group) declares a defect condition and asserts the SF or SD indicators.  In that case, the protection scheme will respond to this event by entirely dropping the Extra Traffic signal and routing the Normal Traffic Signal through the Protection-Transport entity in its place.

In some cases, the system operator will transmit the NULL signal, or the ODU-OCI Maintenance signal, via the Protection Transport entity, instead of the Extra-Traffic Signal.

However, unlike the NULL Signal or the ODU-OCI  Maintenance signal, the Extra Traffic Signal can transport user (or client) traffic.  The end customers need to know that their traffic is a lower priority and that Protection-Switching events can preempt (or wipe out) their traffic/service.

In some cases, the Network Service Provider can offer their customers service via an Extra Traffic Signal for a reduced price because this traffic is low priority and preemptible.  

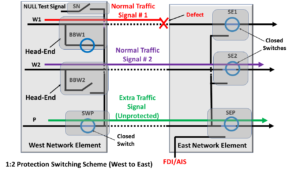
Figure 1 presents a drawing of a 1:2 Protection Switching system.

This figure shows the Normal Traffic signals traveling on the two Working Transport entities.  Normal Traffic Signal # 1 travels along W1 (the Working Transport Entity # 1).  Further, Normal Traffic Signal # 2 travels along W2 (the Working Transport Entity # 2).  

Additionally, this figure shows the Extra Traffic Signal traveling through the Protect Transport entity (P).  

1:2 Protection Switching Architecture - Normal Condition

Figure 1, Drawing of a 1:2 Protection Switching system, with the Extra Traffic Signal highlighted.

How Protection-Switching Preempts the Extra Traffic Signal

If the Network declares a service-affecting defect within one of the Working Transport entities, all the following events will occur.

  • The affected Normal Traffic Signal will now use the Protect Transport entity instead, and
  • The Protection-Switching Network will drop (or preempt) the Extra Traffic Signal.

Figure 2 shows a drawing of the 1:2 Protection Group during protection switching.

In this case, the Network declared a defect within the Working Transport entity associated with Normal Traffic Signal # 1.

Consequently, Normal Traffic Signal # 1 is now using the Protect Transport entity, and the Protection Group is now pre-empting the Extra Traffic signal.

1:2 Protection Switching Architecture - Defect Condition

Figure 2, Drawing of a 1:2 Protection Switching system when a Protection Switch preempts the Extra Traffic signal.

NOTE:  The Extra Traffic signal cannot be a high-priority signal for the following reasons.

  • We do not protect this signal.  If a Service-Affecting defect occurs and we, in turn, lose the Extra-Traffic Signal, our Protection-Switching system will do nothing about it.
  • Even worse, the Extra-Traffic signal is also expendable should one of the Normal Traffic signals need to use the Protect Transport entity.

Has Inflation got You Down? Our Price Discounts Can Help You Beat Inflation and Become an Expert on OTN and Protection-Switching!! Click on the Banner Below to Learn More!!

Discounts Available for a Short Time!!

Click on the Image Below to see more Protection-Switching related content on this Blog:

Protection-Switching Related Blog

Protection-Switching Related Blog Posts

Protection-Switching Related Blog Posts Basic Protection-Switching Terms Head-End (Source Node) Hold-Off Timer Protection-Group Protection-Transport entity Selector Switch Tail-End (Sink Node) ...

What is 1+1 Protection Switching (APS)

This post defines and describes the term 1+1 Protection Switching.


What is 1+1 Protection Switching?

ITU-T G.808 Defines 1+1 (Protection) Architecture as:
A 1+1 protection architecture has one normal traffic signal, one working transport entity, one protection transport entity, and a permanent bridge.
At the source end, the normal traffic signal is permanently bridged to both the working and the protection transport entities.  

At the sink end, the normal traffic signal is selected from the better of the two transport entities.

Due to the permanent bridging, the 1+1 (protection) architecture does not allow an unprotected extra traffic signal to be provided.  

What Does All This Mean?

As for all Protection Groups, a 1+1 Protection Architecture consists of the following elements.

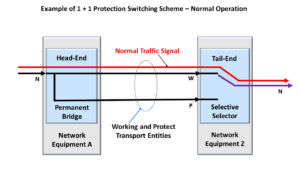
Figure 1 presents an illustration of a 1+1 Protection Switching Architecture.

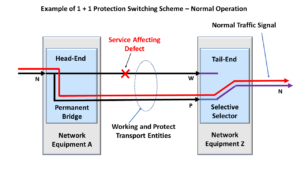
1+1 Protection Switching Architecture - Normal Operation

Figure 1, Illustration of a 1+1 Protection Switching Architecture – Normal (No Defect) Condition

How to Know if You’re Working with a 1+1 Protection Architecture?

This figure shows that a Permanent Bridge realizes the Head-End (of this Protection Group) and that a Selector Switch realizes the Tail-end.  This is a crucial characteristic of the 1+1 Protection Architecture.  

As we defined earlier (from the excerpts of ITU-T G.808), the Permanent Bridge means that there is a hardwired connection between the Normal Traffic Signal and both the Working and Protection Transport entities at the Head-End circuitry.  This fact helps you to identify a 1+1 Protection Architecture quickly.  This is not the case for a 1:N Protection Architecture.  

You can see all of this in Figure 1.  

No-Defect Operation of the Normal Traffic Signal in a 1+1 Protection Architecture

The Normal Traffic Signal will travel through the Working Transport entity for normal conditions, as shown in Figure 1.

Although the Normal Traffic signal is bridged (or connected) to both the Working and Protect Transport entities, it only flows through the Working Transport entity because we connected the Selector switch to the Working Transport entity.

Whereas the Selector Switch leaves the connection between the Protection Transport entity and the Tail-End circuitry, OPEN.

Clueless about OTN and Protection Switching? We Can Help!!! Click on the Banner Below to Learn More!!!

Corporate Discounts Available!!!

A Service-Affecting Defect occurs.

Now, let us look and see what happens if “bad things” occur.

Figure 2 presents an illustration in which an impairment now exists within the Working Transport entity; this impairment causes the Protection Controller (not shown but sitting behind the Tail-end circuitry) to declare a Service-Affecting defect (e.g., SF) or SD.

1+1 Protection Switching Architecture - Defect Condition

Figure 2, Illustration of a Service-Affecting Defect within the Working Transport entity

In this case, the Normal Traffic signal can no longer travel through the Working Transport entity.

If our circuitry did not have any protection switching capability, then all the customers (and end-users) of the Normal Traffic Signal would lose their service.

This would be very bad, especially for the service provider and their financial future.

Protection Switching Occurs

Fortunately, this system does offer protection switching.

In this case, since the Protection Controller has detected and declared a service-affecting defect condition within the Working Transport entity signal, it will then switch the Selector such that it is now connected to the Protect Transport entity, as we show in Figure 3.

1+1 Protection Switching - Protection Switching Condition

Figure 3, Illustration of Normal Traffic signal flow – following Protection Switching

Once the Selector switches over and connects to the Protection Transport entity, the Normal Traffic signal will flow through the Protection Transport entity.

This is an excellent thing for all parties involved.

The users (of the Normal Traffic signal) will get their data or have their service still available.  And the service provider will have fewer irate customers and nasty phone calls.

Other Considerations for 1+1 Protection Switching

The 1+1 Protection Switching Architecture is quite simple.

We usually implement the head-end with a Permanent Bridge and realize the tail-end with a Selector switch.

However, there are some variations that we need to consider for the 1+1 Protection Switching architecture.

Unidirectional or Bidirectional Switching

The user can design their 1+1 Protection Switching architecture to be either a Unidirectional or Bidirectional type.

Please see the Unidirectional and Bidirectional Protection Switching posts for more details on these terms.

NOTE:  If you intend to use Bidirectional Protection Switching, then you will need to use some form of APS communication link/protocol to coordinate the switching of both ends of the protection group.

Protection Ratio:

The protection ratio for a 1+1 Protection Switching system is not very good.  This situation is not good because the user must design twice (2X) the bandwidth of the Normal Traffic signal.

We have to allocate 1X of the bandwidth for the Working Transport entity and 1X for the Protection Transport entity.

To Revert or Not-Revert

If a Protection Switching architecture supports “revert” (or reverting), then this means that the Selector switch will automatically switch back to the Working Transport entity once the service-affecting defect (which caused the switching event) has cleared.

Please see the post on revert for more details about this option.

Has Inflation got You Down? Our Price Discounts Can Help You Beat Inflation and Help You Become an Expert on OTN and Protection-Switching!! Click on the Banner Below to Learn More!!

Discounts Available for a Short Time!!

Click on the Image Below to see more Protection-Switching related content on this Blog:

Protection-Switching Related Blog

Protection-Switching Related Blog Posts

Protection-Switching Related Blog Posts Basic Protection-Switching Terms Head-End (Source Node) Hold-Off Timer Protection-Group Protection-Transport entity Selector Switch Tail-End (Sink Node) ...
What is the Tail-End for Protection Switching?

This post defines and describes the term Tail-End for (APS) Automatic Protection Switching applications.

What is the Tail-End within an APS (Automatic Protection Switching) System?

ITU-T G.808 Defines the Tail-End as:

The tail-end of a protection group is the end where the selector process is located.  In the case where traffic is protected in both directions of transmission, the tail-end process is present at every end of the protection group.

NOTE:  Whenever people discuss the tail-end of an APS system, they will sometimes use the term sink node.

ITU-T G.808 Defines the Sink Node (within a Protection Group) as:

The node at the egress of a protected domain, where a normal traffic signal may be selected from either the working transport entity or the protection transport entity.

So What Does All This Mean?

In Figure 1, we present an illustration of a Protection Group.

If we were to look closely at the Normal Traffic Signal (in Figure 1), we would see that the Tail-End is the last component that the Normal Traffic signal passes through as it exits the Protection Group.

Protection Group - 1:N

Figure 1, Illustration of a Protection Group

The Tail-End (or Sink Node) circuitry is responsible for declaring and clearing defects and asserting (or de-asserting) the SF (Signal Fail) and SD (Signal Degrade) indicators.

The Sink Node (or Tail-End) will use these SF and SD indicators to select either the Working or Protect Transport entity as its source for the Normal Traffic Signal.

Figure 2 illustrates a simplified schematic within the Tail-End Circuitry (including the Protection-Switching Controller).  

Tail End Circuitry - Protection-Switching Controller for a 1+1 Protection Architecture

Figure 2, Illustration of the Tail-End Circuitry

Additionally, Figure 2 shows that the Tail-End Circuitry contains circuitry that detects and declares defect conditions and asserts the SF or SD indicators.   This circuitry also includes the Protection-Switching Controller.  I will describe how this circuitry works in another post.  

Another post discusses the SF (Signal Fail) and SD (Signal Degrade) indicators.

As I show in Figure 2, the Tail-End will often use a Selector Switch that connects to the Working or Protection Transport entity.

If the Selector Switch is connected to the Working Transport entity, then the Tail-End circuitry will be using it (the Working Transport entity) as its source of the Normal Traffic signal.

The Normal Traffic signal will then propagate through the Tail-End circuitry as it exits the Protection Group.

But, if the Selector (Switch) is connected to the Protect Transport entity, then the Tail-End circuitry will be using the Protect Transport entity as its source of the Normal Traffic signal.

USING THE SELECTOR IN A 1+1 AND 1:N PROTECTION SWITCHING ARCHITECTURE

Figures 3 and 4 show drawings of the Protection Group using a Selector (Switch) in a 1+1 and 1:2 Protection Switching scheme, respectively

Selector in a 1+1 Protection Switching System

Figure 3, Illustration of a Selector within a 1+1 Protection Switching Scheme

Selector in a 1:2 Protection Switching System

Figure 4, Illustration of a Selector within a 1:2 (1:N) Protection Switching Scheme

In the case of the 1+1 Protection Switching scheme, the Working and Protect Transport entities always carry the Normal Traffic Signal.

However, the Protection Switching controller function within the Tail-End circuitry (not shown in Figure 3) will determine whether to select the Normal Traffic signal from the Working or the Protect Transport entity.

Suppose the Protection Switching controller function was to declare (for example) the SF (Signal Fail) or SD (Signal Degrade) defect condition within the Normal Traffic signal passing through the Working Transport entity.  In that case, it will command the Selector Switch to switch over and connect to the Protect Transport entity.

Whenever the Selector Switch switches from the Working to the Protect Transport entities, we call this action protection switching.

Some Protection Groups support a revert feature, where the Selector Switch automatically switches back to connecting to the Working Transport entity after the SF or SD defect has cleared.

Other Protection Groups are non-reverting systems and do not support this feature.

In other blog posts, we discuss the Protection Switching controller function and the revert operation.

Clueless about OTN and Protection Switching? We Can Help!!! Click on the Banner Below to Learn More!!!

Corporate Discounts Available!!!

THE NEED FOR COMMUNICATION BETWEEN THE TAIL-END AND HEAD-END COMPONENTS OF A PROTECTION GROUP

The Selector Switch will connect to either the Working or Protect Transport entity, depending upon whether the Protection Switching controller circuitry declares the SF or SD defect within the Normal Traffic signal traveling through these transport entities.

The circuitry that detects and declares these defects (and commands the Selector to switch) resides on the Tail-End side of the Working/Protect Transport entities.

Therefore, in many Protection Switching architectures (e.g., 1:1, 1:n, and Bidirectional 1+1), the Tail-End will need to communicate and coordinate its protection-switching actions with the Head-End circuitry (within the Protection Group) via a communication link.

We discuss this APS communication link (or protocol) in another blog post.

Summary

The Tail-End (called the Sink Node) is usually the last component that a Normal Traffic Signal will pass through as it leaves the Protection Group.

The Tail-End (or Sink Node) contains circuitry that will determine if it should declare any service-affecting defects with the Working and Protect Transport entities and assert the SF (Signal Fail) signal as appropriate.

This Tail-End circuitry will also check the Working and Protect Transport entities for excessive errors (within the OTUk/ODUk signal) and assert the appropriate SD (Signal Degrade) signal.

The Sink Node (or Tail-End) circuitry will use these SF and SD signals to decide whether the Selector Switch should select the Normal Traffic Signal from the Working or the Protect Transport entities.

For normal (no defect) conditions, the Selector Switch will connect to and accept the Normal Traffic Signal from the Working Transport entity.

In this case, the Normal Traffic signal will travel from the Working Transport entity to and through the Tail-end circuitry as it leaves the Protection Group.

However, suppose the Protection-Switching controller determines that the Normal Traffic signal, when passing through the Working Transport entity, contains service-affecting defects, such as SF or SD.  In that case, it will command the Selector Switch to switch over and connect to the Protect Transport entity.

In this case, the Selector will now obtain the Normal Traffic signal from the Protect Transport entity (instead of the Working Transport entity).

Whenever the Selector switches from the Working to the Protect Transport entity, we call this action Protection Switching.

Has Inflation got You Down? Our Price Discounts Can Help You Beat Inflation and Become an Expert on OTN and Protection-Switching!! Click on the Banner Below to Learn More!!

Discounts Available for a Short Time!!!

Click on the Image Below to see more Protection-Switching related content on this Blog:

Protection-Switching Related Blog

Protection-Switching Related Blog Posts

Protection-Switching Related Blog Posts Basic Protection-Switching Terms Head-End (Source Node) Hold-Off Timer Protection-Group Protection-Transport entity Selector Switch Tail-End (Sink Node) ...