What is the OTSiG/OTUk_A_Sk Atomic Function?
The expression: OTSiG/OTUk_A_Sk is an abbreviation for the term: Optical Tributary Signal Group to OTUk Adaptation Sink Function.
This blog post will briefly describe the OTSiG/OTUk_A_Sk set of atomic functions.
Changes in Terminology
Before we proceed on with this post, we need to cover some recent changes in terminology. Before the June 2016 Version of ITU-T G.709, the standard documents referred to this particular atomic function as the OPSM/OTUk_A_Sk function.
However, the standards committee has recently decided to change the wording from using the term OPSM (Optical Physical Section Multilane) to using the name OTSiG (for Optical Tributary Signal Group).
What is an OTSiG?
For completeness, I will tell you that ITU-T G.709 defines the term OTSiG as:
“The set of OTSi signals that supports an OTU.”
In other words, an OTSiG supports transporting an OTUk signal over multiple lanes in parallel.
Therefore, where we used the OTSi/OTUk_A_So and OTSi/OTUk_A_Sk functions for ‘single-lane” applications, we will use the OTSiG/OTUk_A_So and OTSiG/OTUk_A_Sk functions for “multi-lane” applications.
In summary, to “speak the same language,” as does the standard committee, we will call this atomic function the OTSiG/OTUk_A_Sk atomic function.
Likewise, in another post, we will now call (what we used to call the OPSM/OTUk_A_So function) the OTSiG/OTUk_A_So function.
I have created another post that provides documentation of the relationships between some of the old (now obsolete) terms and the new (and approved) terms that our standards committee is currently using.
Stuck at Home? You Can Be an Expert on OTN Before You Return to Your Office!!! Click on the Banner Below to Learn More!!
Corporate Discounts Available!!

Some More Information about Multi-Lane Interfaces for OTU3 and OTU4 Applications
First, we only use the OTSiG/OTUk_A_Sk and OTSiG/OTUk_A_So functions for OTU3 and OTU4 Multi-Lane applications.
We will use the OTSiG/OTUk_A_Sk function for OTU3 applications to model circuitry that receives and processes an OTU3 data stream via an OTL3.4 interface. ITU-T G.709 defines the OTL3.4 Interface as an approach to transporting OTU3 traffic over 4-lanes in parallel.
Likewise, we will use the OTSiG/OTUk_A_Sk function for OTU4 applications to model circuitry that receives and processes an OTU4 data stream via an OTL4.4 interface. ITU-T G.709 also defines the OTL4.4 Interface as an approach to transporting OTU4 traffic over 4-lanes in parallel.
Please see the blog posts for the OTL3.4 and OTL4.4 Interfaces for more information on these topics.
The OTSiG/OTUk_A_Sk Function
The OTSiG/OTUk_A_Sk function is any circuit that takes a group of four electrical lane signals (e.g., the OTSiG signal) and converts this data back into the OTUk signal.
More specifically, the System-Designer will apply this OTSiG group of signals (which are of the OTL3.4 format for OTU3 applications and the OTL4.4 format for OTU4 applications) to the OTSiG_AP Input Interface.
NOTE: These OTL3.4 or OTL4.4 format signals carry a fully-framed, scrambled OTU3 or OTU4 data stream, often including Forward-Error-Correction.
The OTSiG/OTUk_A_Sk function will then:
- Multiplex each of these four electrical lanes (of the OTL3.4 or OTL4.4 signals) back into a single OTU3 or OTU4 data stream.
- Afterward, this function will descramble this OTU3/4 data stream, decode the FEC, and then convert this group of signals into OTUk data, clock, frame-start, and multi-frame-start signals.
- Finally, this function will output these signals to downstream circuitry (such as the OTUk_TT_Sk function).
Once again, ITU-T G.798 states that the system designer can use this function for either OTU3 or OTU4 rates.
For OTU1 and OTU2 rates, we recommend that the system designer use the OTSi/OTUk_A_Sk function instead.
We discuss the OTSi/OTUk_A_Sk atomic function in another post.
Figure 1 presents a simple illustration of the OTSiG/OTUk_A_Sk function.

Figure 1, Simple Illustration of the OTSiG/OTUk_A_Sk function.
Versions of the OTSiG/OTUk_A_Sk Function
ITU-T G.798 defines two versions of this particular function. Additionally, there are other versions of this function that are not specified by ITU-T G.798. I list some popular versions of this function below in Table 1.
Table 1, List of Some Popular Versions of the OTSiG/OTUk_A_So function.
| Function Name | Description | Comments |
| OTSiG/OTUk-a_A_Sk | OTSiG to OTUk Adaptation Sink Function with ITU-T G.709 Standard FEC. | Can be used for OTU3 and OTU4 applications ONLY. |
| OTSiG/OTUk-b_A_Sk | OTSiG to OTUk Adaptation Sink Function with No FEC. | Can be used for OTU3 Applications. |
| OTSiG/OTUk-v_A_Sk | OTSiG to OTUk Adaptation Sink Function with Vendor-Specific FEC | Can be used for OTU3 and OTU4 Applications.
Not specified by ITU-T G.798. |
Table 1 shows that the OTSiG/OTUk-a_A_Sk and the OTSiG/OTUk-v_A_Sk functions will compute and decode some sort of FEC field within the backend of each incoming OTUk frame.
However, this table also shows that the OTSiG/OTUk-b_A_Sk version does not support FEC decoding.
Therefore, ITU-T G.798 states that one can use the OTSiG/OTUk-a_A_Sk function for OTU3 and OTU4 applications. Further, the standard recommends that the user NOT use the OTSiG/OTUk-b_A_Sk function for OTU4 applications.
Network Equipment operating at the OTU4 rate is required to use Forward-Error-Correction.
What Version (of the OTSiG/OTUk_A_Sk function) will we Discuss Throughout this Post?
Throughout this post, we will be discussing the OTSiG/OTUk-a_A_Sk version of this atomic function.
The OTSiG/OTUk-b_A_Sk and OTSiG/OTUk-v_A_Sk atomic functions do everything that the OTSiG/OTUk-a_A_Sk does, except that the -b version does NO FEC Decoding, and the -v version does FEC Decoding differently than what I describe here.
Clueless about OTN? We Can Help!!! Click on the Banner Below to Learn More!!!
Discounts Available for a Short Time!!
So What All Does this Atomic Function Do – In Detail?
The OTSiG/OTUk-a_A_Sk function will accept the 4-lanes of traffic that make up the OTSiG signals from upstream Optical-to-Electrical Conversion circuitry. This function will perform the following tasks on this incoming data stream.
- Multiplexing – It will multiplex each of the four lanes of traffic of the OTL3.4 or OTL4.4 signal back into a single OTU3 or OTU4 signal, respectively.
- Descrambling – It will descramble this incoming data stream.
- FEC Decoding – The function will decode the FEC field (within the backend of each incoming OTUk frame) and detect and correct most symbol errors within this data stream.
- Extract the Frame-Start and Multi-Frame Start signals from this incoming data stream.
- Detect and Flag the following service-affecting defect conditions.
- Assert the CI_SSF (Server Signal Fail Indicator) output signal (towards the downstream OTUk_TT_Sk function) anytime it declares any service-affecting defect.
- Output the remaining OTUk data stream, the OTUk clock signal, the Frame-Start, and Multiframe Start signals to downstream circuitry (e.g., typically the OTUk_TT_Sk atomic function).
NOTE: (*) – Indicates that you need to be a member of THE BEST DARN OTN TRAINING PRESENTATION…PERIOD!! to see this link.
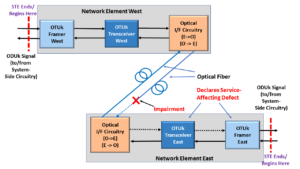
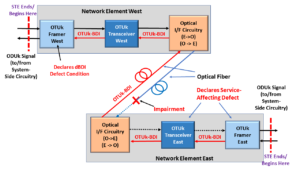
Figure 2 illustrates a Unidirectional Connection that shows where the OTSiG/OTUk-a_A_Sk function “fits in” within a system.

Figure 2, Illustration of an STE, transmitting an OTUk signal (over optical fiber) to another STE – the OTSiG/OTUk-a_A_Sk function is highlighted.
Functional Description of this Atomic Function
Let’s now take a closer look at this function.
The OTSiG/OTUk-a_A_Sk functional block diagrams are different for OTU3 applications than for OTU4 applications. Therefore, we will first walk through the Functional Block Diagram for OTU3 applications.
Afterward, we will do the same for OTU4 applications.
Review of the OTSiG/OTU3-a_A_Sk Functional Block Diagram – OTU3 Applications
Figures 3 and 4 present the Functional Block Diagram of the OTSiG/OTUk-a_A_Sk Atomic Function for OTU3 applications.
NOTE: The Functional Block Diagrams for this function are rather large and complicated. Therefore, I had to spread the OTU3 Functional Block Diagram over two figures (Figures 3 and 4).
More specifically, Figure 3 presents the OTUk_CP Side of the OTSiG/OTUk-a_A_Sk function, and Figure 4 shows the OTSiG_AP Side of this function.

Figure 3, The OTUk_CP Interface Side of the OTSiG/OTUk-a_A_Sk function.
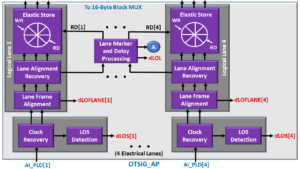
Figure 4, The OTSiG_AP Interface Side of the OTSiG/OTUk-a_A_Sk function.
Therefore, Figures 3 and 4 show that the OTU3-version of this function contains the following functional blocks.
- Clock-Recovery and LOS-Detection Block
- Lane Frame Alignment Block
- The Lane Alignment Recovery Block
- Lane-Marker and Delay-Processing Block
- Elastic Store
- 16-Byte Block MUX
- (OTU3) Frame-Alignment and dLOF-Detection Block
- Descrambler Block
- FEC Decoder Block
- Multi-Frame Alignment and dLOM Detection Block
I will briefly discuss each of these functional blocks below.
The Clock-Recovery and dLOS-Detection Block (4 for OTU3 Applications)
Once our 4-lane Optical Signal passes through the Optical-to-Electrical Conversion (or Demodulator) circuitry, it will be an electrical OTL3.4 signal. The System-Designer should route each of these OTL3.4 electrical lanes signals to the AI_PLD[1] to AI_PLD[4] inputs to this function.
Once these electrical signals enter the OTSiG/OTU3-a_A_Sk function, they will pass through their corresponding Clock Recovery and dLOS Detection Block.
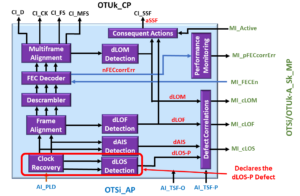
I show an illustration of the OTSiG_AP Side of the OTSiG/OTU3-a_A_Sk Functional Block Diagram below with the Clock Recovery and dLOS Detection blocks, highlighted below in Figure 5.

Figure 5, Illustration of the OTSiG_AP Side of the OTSiG/OTU3-a_A_Sk Functional Block Diagram, with the Clock Recovery and dLOS Detection blocks highlighted.
The OTSiG/OTU3-a_A_Sk function has four Clock Recovery and dLOS Detection Blocks (one for each of the four lanes within the incoming OTL3.4 signal).
The Clock Recovery block is responsible for recovering the clock signal and the data content within a given OTL3.4 lane signal via its corresponding AI_PLD[n] input pin.
Since the OTSiG/OTUk-a_A_So atomic function (at the remote STE) should have scrambled this data stream, each of these incoming lane signals should always have good timing content (or transitions) so that this Clock Recovery block can acquire and extract out both a recovered clock signal and data-stream from each of these incoming lane signals.
Suppose the Clock Recovery block (along with the dLOS Detection Block) were to determine that there is a lengthy absence in signal transitions (within its incoming lane data-stream). In that case, it will declare the dLOS-P (Loss of Signal – Path) defect for that particular electrical lane.
Please check out the dLOS blog post for more information about the dLOS-P defect condition.
The OTSiG/OTUk-a_A_Sk function will route this recovered clock and data signal (for each electrical lane) to its Lane Frame Alignment block for further processing.
Lane Frame Alignment Block (4 for OTU3 Applications)
The OTSiG/OTU3-a_A_Sk function contains 4 Lane Frame Alignment blocks, one for each Logical (or Electrical) Lane.
I show an illustration of the OTSiG/OTU3-a_A_Sk Functional Block Diagram with the Lane Frame Alignment Blocks highlighted below in Figure 6.
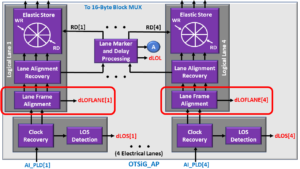
Figure 6, Illustration of the OTSiG/OTU3-a_A_Sk Functional Block Diagram with the Lane Frame Alignment Blocks highlighted.
In the OTL3.4 post, we mention that (as we create these OTL3.4 lane signals, we purpose “Lane Rotation” as each frame boundary to ensure that each logical lane will carry the FAS-field at some point.
These Lane Frame Alignment blocks aim to acquire FAS-Frame Synchronization with their corresponding Logical Lane signal. In other words, these Lane Frame Alignment blocks strive to locate each FAS field and maintain a Lane-FAS Frame synchronization with their respective lanes.
Each Lane Frame Alignment block will also declare and clear the dLOFLANE (Loss of Frame – Lane) defect condition as appropriate. Please see the post on the dLOFLANE defect for more information about this defect condition.
The OTSiG/OTU3-a_A_Sk Function will route these logical lane signals to their own Lane Alignment Recovery Blocks.
Lane Alignment Recovery Block (4 for OTU3 Applications)
The OTSiG/OTU3-a_A_Sk Function contains four Lane Alignment Recovery blocks (one for each Logical Lane it processes).
I show an illustration of the OTSiG/OTU3-a_A_Sk Functional Block Diagram with the Lane Alignment Recovery blocks highlighted below in Figure 7.

Figure 7, Illustration of the OTSiG/OTU3-a_A_Sk Functional Block Diagram with the Lane Alignment Recovery blocks highlighted.
These Lane Alignment Recovery blocks aim to acquire LLM (Logical Lane Marker) Frame Synchronization with its corresponding Logical Lane signal.
The Lane Alignment Recovery blocks also have the following responsibilities:
- To report the LLM value, within its logical lane, to the Lane Marker and Delay Processing block, and
- To alert the Lane Marker and Delay Processing block, the instant that (the Lane Alignment Recovery block) detects and receives the LLM fields within its incoming Logical Lane data stream.
Four blocks will work in tandem with the Lane Marker and Delay Processing block to declare and clear the dLOL (Loss of Lane Alignment) defect condition.
Please see the blog post on the dLOL defect to learn more about this defect condition.
Once a given Logical Lane signal passes through the Lane Alignment Recovery block, the OTSiG/OTU3-a_A_Sk function will route these signals to the Elastic Store block for further processing.
Lane Marker and Delay Processing Block (1 for OTU3 Applications)
The OTSiG/OTU3-a_A_Sk function only has one Lane Marker and Delay Processing block.
I illustrate the OTSiG/OTU3-a_A_Sk Functional Block Diagram with the Lane Marker and Delay Processing Block highlighted below in Figure 8.

Figure 8, Illustration of the OTSiG/OTU3-a_A_Sk Functional Block Diagram with the Lane Marker and Delay Processing Block highlighted.
The Lane Marker and Delay Processing block have the following responsibilities:
- To declare and clear the dLOL defect condition.
- To compensate for skew between each of the four Logical Lanes.
- And to ensure that each Logical Lane will be processed in the correct order/sequence, the OTSiG/OTU3-a_A_Sk function will successfully reconstruct the original OTU3 data stream.
- To ensure that each Logical Lane has its unique value for the LLM ID.
To accomplish this, the Lane Marker and Delay Processing block will work in tandem with each of the 4 Lane Alignment Recovery blocks and the Elastic Store blocks.
In general, the Lane Marker and Delay Processing block will use the “LLM Received” information from each of the 4 Lane Alignment Recovery blocks to determine the amount of skew between them.
The Lane Marker and Delay Processing block will use the Elastic Store blocks to buffer and delay all of the “faster” Logical lanes until the “slowest” (or most delayed) Logical Lane “catches up.”
Once this slowest Logical Lane catches up, the Lane Marker and Delay Processing block will allow the 16-Byte MUX to read out the contents of the logical lane data from each of the 4 Elastic Store blocks.
The Elastic Store Block (4 for OTU3 Applications)
The OTSiG/OTU3-a_A_Sk function contains four Elastic Store blocks (one for each Logical Lane).
I illustrate the OTSiG/OTU3-a_A_Sk Functional Block Diagram with the Elastic Store blocks highlighted below in Figure 9.

Figure 9, Illustration of the OTSiG/OTU3-a_A_Sk Functional Block Diagram with the Elastic Store blocks highlighted.
The Elastic Store block is an array of buffers (or storage) within the four logical lanes. The OTSiG/OTU3-a_A_Sk function will load the contents of each Logical Lane data stream into this buffer as it arrives at this block.
However, the Lane Marker and Delay Processing Block will determine how long this data will remain in this Elastic Store block before it travels downstream towards the 16-Byte Block MUX.
The Lane Marker and Delay Processing block will control exactly when this Logical Lane data is read out from each of the 4 Elastic Store blocks to compensate for skew between each Logical Lanes.
16-Byte Block MUX (1 for OTU3 Applications)
The OTSiG/OTU3-a_A_Sk function contains one 16-Byte Block MUX.
I show an illustration of the OTUk_CP Interface Side of the OTSiG/OTU3-a_A_Sk Functional Block Diagram, with the 16-Byte Block MUX highlighted below in Figure 10.

Figure 10, Illustration of the OTSiG/OTU3-a_A_Sk Functional Block Diagram (OTUk_CP Side) with the 16-Byte Block MUX Highlighted.
The purpose of the 16 Byte Block MUX is to read out the contents of each of the Elastic Store blocks (with each of the four Logical Lanes) and to multiplex this data into a single OTU3 data stream.
The 16 Byte Block MUX (as its name implies) will read out data, 16 bytes at a time, from each of the four Elastic Store blocks. Additionally, the 16-Byte Block MUX will execute these READ Operations under the direction of the Lane Marker and Delay Processing block.
The 16 Byte Block MUX, the Lane Marker, and Delay Processing Blocks, and the Lane Alignment Recovery blocks will work together to:
- Compensate for skew between each of the Logical Lanes, and
- Properly multiplex and (reassemble) a full-blown, serial OTU3 data stream.
After the 16-Byte Block MUX has reassembled this OTU3 data stream, it will route this data stream over to the (OTU3) Lane Frame Alignment and dLOF Detection Block for further processing.
Has Inflation got You Down? Our Price Discounts Can Help You Fight Inflation and Help You Become an Expert on OTN!!! Click on the Banner Below to Learn More!!!
Corporate Discounts Available!!!

(OTU3) Frame Alignment and dLOF Detection Blocks
Once our data stream has reached the Frame Alignment and dLOF Detection Block, we are no longer working with OTL3.4 Logical Lanes. The 16 Byte Block MUX has multiplexed all four logical lanes into a single OTU3 data stream.
I illustrate the OTSiG/OTU3-a_A_Sk Functional Block Diagram with the Frame Alignment and dLOF Detection Blocks highlighted below in Figure 11.

Figure 11, Illustration of the OTSiG/OTU3-a_A_Sk Functional Block Diagram with the Frame Alignment and dLOF Detection Blocks highlighted.
The only question now is: Did we multiplex the four OTL3.4 Logical Lanes together correctly?
If we were to assume all of the following conditions to be true:
- That none of the four Frame Alignment Blocks (within the OTSiG/OTU3-a_A_Sk function) were declaring the dLOFLANE defect condition, and
- The Lane Marker and Delay Processing block did not report any issues with Excessive Skew.
Then the 16-Byte Block MUX should have correctly and successfully multiplexed these four Logical Lanes into a single valid OTU3 data stream.
However, the (OTU3) Frame Alignment and dLOF Detection Block can serve as an additional check to ensure that our multiplexing operation is successful. This is why I’ve listed this particular functional sub-block as “Optional.”
This sub-block aims to acquire and maintain OTUk-FAS Frame Synchronization with this newly combined OTU3 data stream. If this block fails to obtain and maintain synchronization with the incoming FAS frames, it will declare the dLOF (Loss of Frame) defect condition.
Please see the dLOF (Loss of Frame) blog post for more information on how the Frame Alignment and dLOF Detection Block declare and clear the dLOF defect condition.
Once this OTU3 data stream leaves the Frame Alignment and dLOF Detection Block, it will enter the Descrambler Block for further processing.
Descrambler Block
In the OTSiG/OTUk-a_A_So blog post, I mentioned that the OTSiG/OTUk-a_A_So function would scramble the content of each outbound OTUk frame.
That function will scramble all bytes (within each OTUk frame) except for the FAS fields. This function will even scramble the MFAS field as well.
The purpose of the Descrambler block is to restore the content of each OTUk frame to its original state before being scrambled by the remote STE.
I show an illustration of the OTSiG/OTU3-a_A_Sk Functional Block Diagram with the Descrambler block highlighted below in Figure 12.
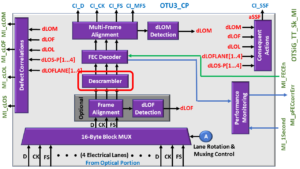
Figure 12, Illustration of the OTSiG/OTU3-a_A_Sk Functional Block Diagram with the Descrambler block highlighted.
In the OTSiG/OTUk-a_A_So function, we scrambled the contents of OTUk frame, using the polynomial generating equation of 1 + x + x3 + x12 + x16.
Therefore, the Descrambler block (within this function) will descramble the incoming OTUk data-stream (again) using the polynomial generating equation of 1 + x + x3 + x12 + x16.
I show a simple diagram of how one can implement the Descrambler within their OTSiG/OTUk-a_A_Sk function design below in Figure 13.

Figure 13, High-Level Block Diagram of the Frame Synchronous Descrambler.
I discuss the Descrambler function and requirements in greater detail in another post.
Once the OTU3 data stream passes through and exits the Descrambler block, it will proceed onto the FEC Decoder block for further processing.
FEC Decoder Block
I illustrate the OTSiG/OTU3-a_A_Sk Functional Block Diagram with the FEC Decoder block highlighted below in Figure 14.

Figure 14, Illustration of the OTSiG/OTU3-a_A_Sk Functional Block Diagram with the FEC Decoder block highlighted.
The OTSiG/OTU3-a_A_So function (at the remote STE) is responsible for performing FEC (Forward-Error-Correction) Encoding.
This means that this function computed a FEC Code and inserted that code into a 4-row x 128-byte column field at the backend of each OTU3 frame, as shown below in Figure 15.

Figure 15, Illustration of the OTUk Frame Format with the FEC Field Highlighted
The purpose of the FEC Decoder (within the OTSiG/OTU3-a_A_Sk function) is to parse through the incoming OTU3 data stream and (by using the contents of the FEC-field) detect and correct most symbol errors within this data stream.
The FEC Decoder block will count and tally any occurrences of Symbol errors (within the incoming OTU3 data stream.). It will report this information to System Management via the MI_pFECcorrErr output (via the OTSiG/OTU3-a_A_Sk_MP Interface).
I discuss Forward-Error-Correction in much greater detail in another post.
Multi-Frame Alignment and dLOM Detection Block
Once the incoming OTU3 data stream passes through the FEC Decoder block, the OTSiG/OTU3-a_A_Sk function will route this signal to the Multi-Frame Alignment and dLOM Detection blocks.
I illustrate the OTSiG/OTU3-a_A_Sk Function Block Diagram with the Multi-Frame Alignment and dLOM Detection block, highlighted below in Figure 16.

Figure 16, Illustration of the OTSiG/OTU3-a_A_Sk Functional Block Diagram with the Multi-Frame Alignment and dLOM Detection Block highlighted.
The Mult-Frame Alignment block will parse through and check the contents of the MFAS field within the incoming OTU3 data stream. The Multi-Frame Alignment block will check the contents of this data stream to see if it (and the dLOM Detection Block) should declare or clear the dLOM (Loss of Multi-Frame Alignment) defect condition.
Please see the blog post on the dLOM defect for more information on how the Multi-Frame Alignment block will declare and clear the dLOM defect condition.
Removal of the FAS, MFAS, and FEC Fields from the incoming OTU3 Data-stream
The Frame-Alignment block will drive the CI_FS (Frame-Start) output of the OTUk_CP Interface, HIGH for one CI_CK (Clock Signal) period, each time it detects the FAS field within its incoming OTUk data-stream.
Likewise, the Multi-Frame Alignment block will drive the CI_MFS (Multi-Frame Start) output of the OTUk_CP Interface, HIGH, for one CI_CK (Clock Signal) period each time it receives an MFAS byte with the value of 0x00.
The Frame-Alignment and Multi-Frame Alignment block will also remove the FAS and MFAS fields from the OTUk data stream (before it outputs this data stream via the CI_D output of the OTUk_CP Interface).
From this point on, the CI_FS and CI_MFS signals will now carry the framing and multi-framing alignment information downstream towards the OTUk_TT_Sk atomic function.
The FEC Decoder block will also remove the contents of the FEC field from the OTUk data stream before it outputs this data via the CI_D output pin.
We have briefly covered the OTSiG/OTUk-a_A_Sk function description for OTU3 applications. Let’s move on and discuss this atomic function for OTU4 applications.
Clueless about OTN? We Can Help!!! Click on the Banner Below to Learn More!!!
Corporate Discounts Available!!!
Review of the OTSiG/OTU4-a_A_Sk Functional Block Diagram – OTU4 Applications
I present the Functional Block Diagram of the OTSiG/OTUk-a_A_Sk Atomic Function for OTU4 Applications below in Figures 14, 15, and 16.
NOTE: The Functional Block Diagrams for this function are rather large and complicated. Therefore, I had to spread the OTU3 Functional Block Diagram over three figures (Figures 17, 18, and 19).
Figure 17 presents the OTUk_CP Side of the OTSiG/OTUk-a_A_Sk function.

Figure 17, Illustration of the Functional Block Diagram of the OTSiG/OTU4-a_A_Sk Atomic Function – The OTUk_CP Interface Side
Additionally, Figure 18 presents the Middle Portion of the OTSiG/OTUk-a_A_Sk function.

Figure 18, Illustration of the Functional Block Diagram of the OTSiG/OTU4-a_A_Sk Atomic Function – The Middle Portion
Finally, Figure 19 shows the OTSiG_AP Side of this function.

Figure 19, Illustration of the Functional Block Diagram of the OTSiG/OTU4-a_A_Sk Atomic Function – The OTSiG_AP Interface Side
Hence, these figures show that the OTU4 version of this function contains the following functional sub-blocks.
- The Clock Recovery and dLOS Detector Block
- The 1/5 Bit De-Interleaver Blocks
- The Lane Frame Alignment Blocks
- The Lane Alignment Recovery Blocks
- The LLM Removal Block
- The Lane Marker and Delay Processing Block
- The Elastic Store Blocks
- The 16-Byte Block MUX
- The (OTU4) Frame Alignment – dLOF Detection Block
- The Descrambler Block
- The FEC Decoder Block
- The Multi-Frame Alignment and dLOM Detection Block
I will discuss some of these Functional blocks below. Please note that some of these blocks are identical to what I’ve presented for OTU3 applications. I will note that whenever I come across those functional sub-blocks.
The Clock Recovery and dLOS Detection Block (4 for OTU4 Applications)
Please see the description for the Clock Recovery and dLOS Detection Block above for OTU3 applications.
The 1/5 Bit De-Interleaver Blocks (4 for OTU4 Applications)
Once the OTL4.4 signal passes through the Clock Recovery block, it will proceed onto the 1/5 Bit De-Interleaver blocks for further processing.
The OTSiG/OTU4-a_A_Sk function contains four of these 1/5 Bit De-Interleaver Blocks.
I illustrate the OTSiG/OTU4-a_A_Sk Functional Block Diagram with the 1/5 Bit De-Interleaver blocks highlighted below in Figure 20.

Figure 20, Illustration of the OTSiG/OTU4-a_A_Sk Functional Block Diagram with the 1/5 Bit De-Interleavers blocks highlighted.
Each lane (within the incoming OTL4.4 signal) will pass through its own 1/5 Bit De-Interleaver Blocks.
Each of these 1/5 Bit De-Interleaver blocks will bit-wise demultiplex five logical lanes of traffic from each incoming electrical lane. Therefore, when the four lanes (within an OTL4.4 signal) pass through their own 1/5 Bit De-Interleaver blocks, they will demultiplex this OTL4.4 signal into 20 logical lanes of traffic.
The Lane Frame Alignment Block (20 for OTU4 Applications)
Please see the description for the Lane Frame Alignment Block above for OTU3 applications. Please note that the OTSiG/OTU4-a_A_Sk function will have 20 blocks, whereas the OTU3 version only has 4.
The Lane Alignment Recovery Blocks (20 for OTU4 Applications)
Please see the description for the Lane Alignment Recovery Block above for OTU3 applications. Please note that the OTSiG/OTU4-a_A_Sk function will have 20 blocks, whereas the OTU3 version only has 4.
The LLM (Logical Lane Marker) Removal Blocks (20 for OTU4 Applications)
Once each Logical Lane signal passes through and exits their Lane Alignment Recovery block, they will proceed to their respective LLM Removal Blocks.
I illustrate the OTSiG/OTU4-a_A_Sk functional block diagram with the LLM Removal Blocks highlighted below in Figure 21.

Figure 21, Illustration of the OTSiG/OTU4-a_A_Sk Functional Block Diagram with the LLM Removal Blocks highlighted.
If you recall, from our OTL4.4 post, the OTSiG/OTU4-a_A_Sk function (at the remote STE) will “borrow” the 3rd OA2 byte (within the FAS field of each outbound OTU4 frame) and use it as the LLM (Logical Lane Marker) field.
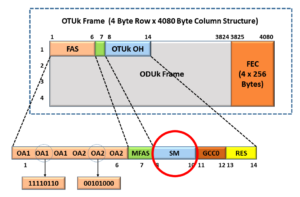
I illustrate the OTU4 Frame format with this LLM (and borrowed OA2) byte-field highlighted below in Figure 22.
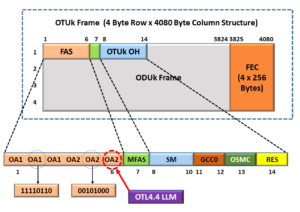
Figure 22, Illustration of an OTU4 Frame with the LLM Field location highlighted.
The purpose of the LLM Removal (in this function) is to remove the LLM field from this 3rd OA2 byte-field and (effectively) give this byte back to the transport system by restoring its value to 0x28.
Once the Logical Lane data stream passes through to the LLM Removal Block, it will proceed to the Elastic Store block for further processing.
The Lane Marker and Delay Processing Block (1 for OTU4 Applications)
Please see the description for the Lane Marker and Delay Processing Block above for OTU3 applications. Please note that the Lane Marker and Delay Processing Block within the OTSiG/OTU4-a_A_Sk function will be working with 20 sets of the Lane Alignment Recovery and Elastic Store Blocks for Skew Compensation purposes.
The Elastic Store Blocks (20 for OTU4 Applications)
Please see the description for the Elastic Store Block above for OTU3 applications. Please note that the OTSiG/OTU4-a_A_Sk function will have 20 blocks, whereas the OTU3 version only has 4.
The 16-Byte Block MUX
Please see the description for the Elastic Store Block above for OTU3 applications.
The (OTU4) Frame Alignment – dLOF Detection Blocks
Please see the description for the Elastic Store Block above for OTU3 applications.
The Descrambler Blocks
Please see the description for the Elastic Store Block above for OTU3 applications.
The FEC Decoder Block
Please see the description for the Elastic Store Block above for OTU3 applications.
The Multi-Frame Alignment – dLOM Detection Blocks
Please see the description for the Elastic Store Block above for OTU3 applications.
Consequent Actions Blocks
I illustrate the OTSiG/OTU4-a_A_Sk function with the Consequent Actions blocks highlighted below in Figure 23.
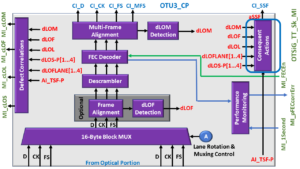
Figure 23, Illustration of the OTSiG/OTU4-a_A_Sk function with the Consequent Actions block highlighted.
In most cases, the System Designer will realize the Consequent Actions Block via digital logic circuitry that will assert the CI_SSF (Server Signal Fail) output (of the OTUk_CP Interface) anytime the OTSiG/OTUk-a_A_Sk function declares the following defect conditions.
NOTE: Whenever this function asserts the CI_SSF output signal, it also asserts the CI_SSF input to the downstream OTUk_TT_Sk function.
The Consequent Action Equation for the OTSiG/OTUk-a_A_Sk Atomic Function
ITU-T G.798 lists the following Consequent Actions Equation below:
- aSSF ⇐ dLOF or dLOM or ∑dLOS-P[i] or dLOL or ∑dLOFLANE[j] or AI_TSF
This equation means that the OTSiG/OTUk-a_A_Sk function should assert the aSSF (and, in turn, drive the CI_SSF output pin HIGH) if any of the following conditions are TRUE:
- The upstream Optical Circuitry is asserting the AI_TSF-P input signal to this function, or
- If the OTSiG/OTUk-a_A_Sk function is declaring any of the following defect conditions:
Defect Correlation
If you wish to learn more about Defect Correlation and how you should interpret it, please see the Defect Correlation Post.
ITU-T G.798 specifies the following correlation equations for each OTSiG/OTUk-a_A_Sk function-related defect.
- cLOS ⇐ ∑dLOS-P[i] and (NOT AI_TSF-P)
- cLOL ⇐ (dLOL or ∑dLOFLANE[j]) and (NOT ∑dLOS-P[i]) and (NOT AI_TSF-P)
- cLOF ⇐ dLOF and (NOT ∑dLOS-P[i]) and (NOT AI_TSF-P)
- cLOM ⇐ dLOM and (NOT dLOF) and (NOT ∑dLOS-P[i]) and (NOT AI_TSF)
I will briefly explain what each of these equations means below.
cLOS ⇐ ∑dLOS-P[i] and (NOT AI_TSF-P)
This equation means that the OTSiG/OTUk_A_Sk function must declare the dLOS defect (and assert the cLOS output pin) if the Clock Recovery and dLOS Detection Circuitry declares the dLOS-P signal within any one of the four electrical lane signals.
This equation also states that the OTSiG/OTUk_A_Sk function must NOT declare the dLOS (and assert the cLOS output pin) if the upstream Optical Circuitry is also asserting the AI_TSF-P input signal (to this function).
cLOL ⇐ (dLOL or ∑dLOFLANE[j]) and (NOT ∑dLOS-P[i]) and (NOT AI_TSF-P)
This equation means that the OTSiG/OTUk_A_Sk function should only declare the dLOL defect (and assert the cLOL output pin) if either of the following conditions is TRUE:
- If the Lane Marker and Delay Processing block is declaring the dLOL defect, OR
- If at least one of the 4 or 20 Logical Lanes declare the dLOFLANE defect conditions.
However, this equation also states that the function CANNOT declare the dLOL defect (and drive the cLOL output pin HIGH) if either of the following conditions is TRUE:
- At least one Clock Recovery and dLOS Detection circuit is also declaring the dLOS-P defect conditions with any one of the four electrical lane signals, OR
- The upstream circuitry currently asserts the AI_TSF-P input pin (to this function).
cLOF ⇐ dLOF and (NOT ∑dLOS-P[i]) and (NOT AI_TSF-P)
This equation means that the OTSiG/OTUk-a_A_Sk function should only declare the dLOF defect (and assert the cLOF output pin) if the Frame Alignment block and the dLOF Detection blocks declare the dLOF defect condition.
However, this equation also states that the function CANNOT declare the dLOF defect (and drive the cLOF output pin HIGH) if any of the following conditions are TRUE:
- At least one Clock Recovery and dLOS Detection circuit is also declaring the dLOS-P defect conditions with any one of the four electrical lane signals, OR
- The upstream optical circuitry is currently asserting the AI_TSF-P input pin (to this function).
cLOM ⇐ dLOM and (NOT dLOF) and (NOT ∑dLOS-P[i]) and (NOT AI_TSF-P)
This equation means that the OTSiG/OTUk-a_A_Sk function should only declare the dLOM defect (and assert the cLOM output pin) if the Multi-Frame Alignment block and the dLOM Detection blocks declare the dLOM defect condition.
However, this equation also states that the function CANNOT declare the dLOM defect (and drive the cLOM output pin HIGH) if any of the following conditions are TRUE:
- The Frame Alignment and dLOF Detection blocks are also declaring the dLOF defect condition, or
- If at least one Clock Recovery and dLOS Detection block is declaring the dLOS defect with its electrical lane signal, or
- The Optical upstream circuitry is currently asserting the AI_TSF-P input pin (to this function).
Performance Monitoring
ITU-T G.798 requires that the OTSiG/OTUk-a_A_Sk Function tally and report the following Performance Monitoring parameter to System Management:
pFECcorrErr ⇐ ∑nFECcorrErr
In other words, we expect the OTSiG/OTUk-a_A_Sk function to tally and report each time the FEC Decoder block corrects an errored symbol within the incoming OTU3 or OTU4 data stream.
Pin Description
I list the Input/Output Pin Description for the OTSiG/OTUk-a_A_Sk Atomic Function below in Table 2.
Table 2, Pin Description for the OTSiG/OTUk-a_A_Sk Atomic Function
| Signal | Type | Description |
| OTSiG Access Point - Interface | | |
| AI_PLD[1...4] | Input | OTSiG Adaptation Information - PLD (Payload) Input Ports 1 through 4:
The user is expected to apply a 4-lane electrical signal to these inputs. This four-lane signal should be an OTL3.4 type of signal for OTU3 applications and an OTL4.4 type of signal for OTU4 applications.
In most cases, this 4-lane electrical signal will have just recently been converted from the optical, back into the electrical format.
The OTSiG/OTUk-a_A_Sk function will convert the 4-lane OTL3.4 signal back into a single-composite OTU3 signal. Likewise, this function will also convert the 4-lane OTL4.4 signal back into a single-composite OTU4 signal. |
| OTUk - Characteristic Information | | |
| CI_D | Output | OTUk Characteristic Information - Data Output:
The OTSiG/OTUk-a_A_Sk function will output the OTUk data via this output. This OTUk data will contain all of the following portions of the OTUk frame.
- OTUk-SMOH (Section Monitoring Overhead) data
- All remaining OTUk payload data (e.g., the ODUk/OPUk data).
This data will not include the FAS, MFAS nor FEC fields, however.
Data that is output via this signal, will be aligned with one of the clock edges of the CI_CK clock output signal. The system designer will typically route this signal to the CI_D input to the downstream OTUk_TT_Sk function. |
| CI_CK | Output | OTUk Characteristic Information - Clock Output:
As the OTUk CP Interface outputs data via the CI_D, CI_FS, CI_MFS and CI_SSF outputs; all of this data will be updated to one of the clock edges of this clock output signal. |
| CI_FS | Output | OTUk Characteristic Information - Frame Start Output:
The OTUk_CP interface will pulse this output signal HIGH whenever the OTUk_CP interface outputs the very first bit (or byte) of a new OTUk frame, via the CI_D output.
This output signal will pulse HIGH once for each OTUk frame. |
| CI_MFS | Output | OTUk Characteristic Information - Multi-Frame Start Output:
The OTUk_CP Interface will pulse this output signal HIGH whenever the OTUk_CP Interface outputs the very first bit (or byte) of a new OTUk multi-frame, via the CI_D output.
This output signal will pulse HIGH once for each OTUk Multi-frame (or once each 256 OTUk fraeme |
| CI_SSF | Output | OTUk Characteristic Information - Server Signal Failure Output:
The OTUk_CP interface will assert this signal anytime the OTSiG/OTUk-a_A_Sk function is declaring a service-affecting defect with the data that it is receiving via the AI_D input.
The OTUk_CP Interface will assert this output signal, whenever the OTSiG/OTUk-a_A_Sk function is declaring any of the followiong defects.
- dLOF
- dLOM
- dLOL
- dLOFLANE (within any of the 4 or 20 logical lanes)
- dLOS-P (within any of the four electrical lanes). |
| OTSiG/OTUk-a_A_Sk_MP Management Interface | | |
| MI_FECEn | Input | OTSiG/OTUk-a_A_Sk FEC Decoding Enable/Disable Input:
This input pin permits the function user to either enable or disable FEC Decoding within the OTSiG/OTUk-a_A_Sk function.
Setting this input HIGH enables FEC Decoding.
Setting this input LOW disables FEC Decoding.
NOTE: This input does not exist for OTU4 applications. |
| MI_1Second | Input | Management Interface - One Second Clock Input:
The user is expeced to supply a clock signal, which has a frequency of 1Hz to this input.
The Performance Monitoring portion of the OTSiG/OTUk-a_A_Sk function will use this clock signal as its timing reference for tallying and reporting the various One-Second Performance Monitoring parameters. |
| MI_cLOF | Output | Management Interface - Loss of Frame (Correlated) Output Indicator:
This output pin indicates if the OTSiG/OTUk-a_A_Sk function is currently declaring the dLOF defect.
If this output pin is LOW, then it indicates that the function is NOT currently declaring the dLOF defect condition.
Conversely, if this output pin is HIGH, then it indicates that the function is currently declaring the dLOF defect condition.
Please the blog post for dLOF defect, to learn more about how the OTSiG/OTUk-a_A_Sk function declares and clears the dLOF defect condition. |
| MI_cLOM | Output | Management Interface - Loss of Multiframe (Correlated) Output Indicator:
This output pin indicates if the OSiG/OTUk-a_A_Sk function is currently declaring the dLOM defect condition.
If this input pin is LOW, then it indicates that the function is NOT currently declaring the dLOM defect condition.
Conversely, if this input pin is HIGH, then it indicates that this function is currently declaring the dLOM defect condition.
Please see the dLOM blog post, for more information on how the OTSiG/OTUk-a_A_Sk function declares and clears the dLOM defect condition. |
| MI_cLOL | Output | Management Interface - Loss of Lane Alignment (Correlated) Output Indicator:
This output pin ndicates if the OTSiG/OTUk-a_A_Sk function is currently declaring the dLOL defect.
If this output pin is LOW, then it indicates that the function is NOT currently declaring the dLOL defect condition.
Conversely, if this output pin is HIGH, then it indicates that the function is currently declaring the dLOL defect condition.
Please see the dLOL blog post for more information on how the OTSiG/OTUk-a_A_Sk function declares and clears the dLOL defect condition. |
| MI_cLOS | Output | Management Interface - Loss of Signal (Correlated) Defect Output Indicator:
This output indicates if the OTSiG/OTUk-a_A_Sk function is currently declaring the dLOS defect condition.
If this output pin is LOW, then it indicates that the function is NOT currently declaring the dLOS defect condition.
Conversely, if this output pin is HIGH, then it indicates that the function is currently declaring the dLOS defect condition.
Please see the dLOS blog post, for more information on how the OTSiG/OTUk-a_A_Sk function declares and clears the dLOS defect condition. |
| MI_pFECcorrErr | Output | Management Interface - FEC Correlated Error Count Output:
This output port reflects the number of symbol errors that the OTSiG/OTUk-a_A_Sk function (via the FEC Decoder) has corrected.
This is a Performance Monitoring feature within the OTSiG/OTUk-a_A_Sk function.
NOTE: This outputpin is INACTIVE if the MI_FECEn input pin is set LOW (to disable the FEC Decoder). |
Clueless about OTN? We Can Help!! Click on the Banner Below to Learn More!!
Discounts Available for a Short Time!!!
Other OTN-Related Posts
Click on the Image below to see more OTN-Related Posts on this blog.

OTN Related Topics within this Blog General Topics Consequent Equations - What are they and How can you use them? ...